Coconut Red Curry & Veggies

This simple and pleasing curried vegetable classic comes from a spurt of energy due to an Iowa warn-up.  Last week we actually had a a couple balmy, sunny days.  It was enough to give me hope for spring!

It actually warmed up enough to melt almost all of the snow and go without jackets a few times.

It was even nice enough to sit on the porch while we had dinner!  I can’t wait to get my summer-cabin themed porch done just right this summer.  I know we will be using it daily.  Anyway, after happy hour or chips & salsa and NA beer, I decided to make something fresh and springy to fit the mood of the afternoon.

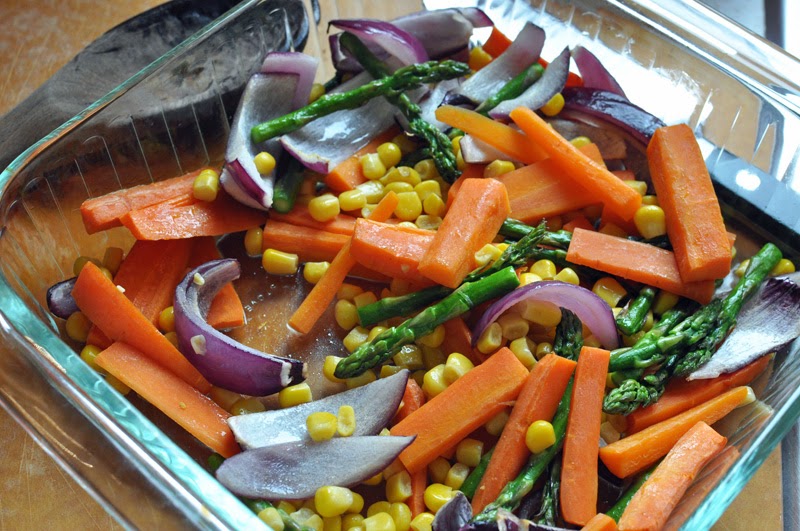
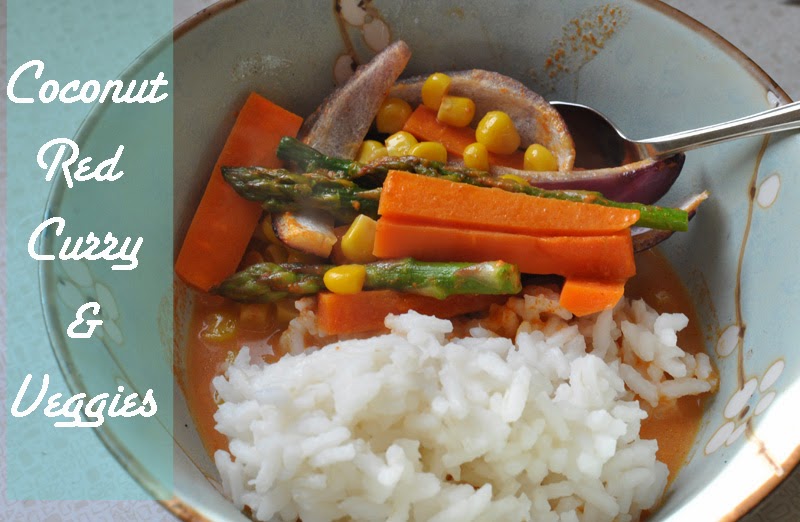
I started by throwing a bunch of veggies into a glass 8″ baking dish – 1/2 a red onion, sliced, 3 medium carrots peeled and sliced, 1 – 2 cups of corn, and a bunch of asparagus stalks, sliced.  I tossed these veggies with sesame oil and then baked these in the oven at 425º for 15 – 20 minutes, or till softened.  If you wanted to make things faster and not use your oven, pop ’em in the microwave for 5 to 6 minutes.

While the veggies are cooking, prepare the curry sauce.  Combine 1-1/2 cups coconut milk, 1 tablespoon coconut sugar or honey, and 2 tablespoons red curry paste in a saucepan.  Stir and cook over medium heat until bubbly and thickened, about 15 minutes.

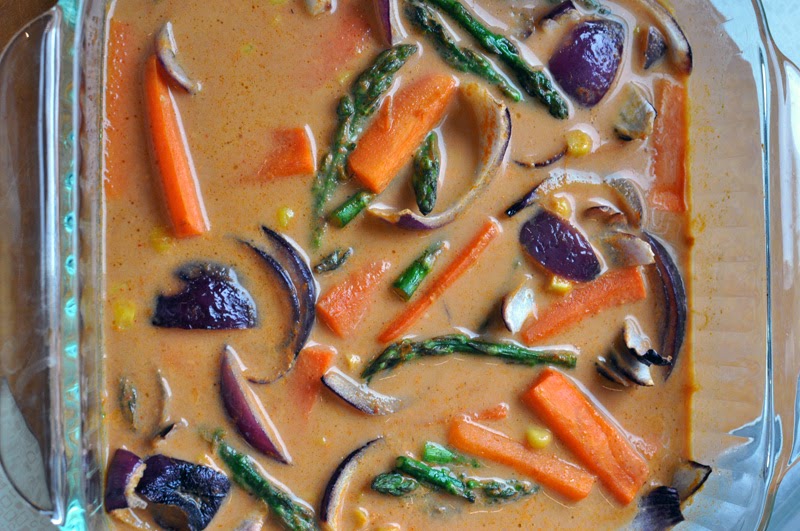
Pour cooked sauce over tops of cooked veggies.  Stir. Serve over warm cooked rice.

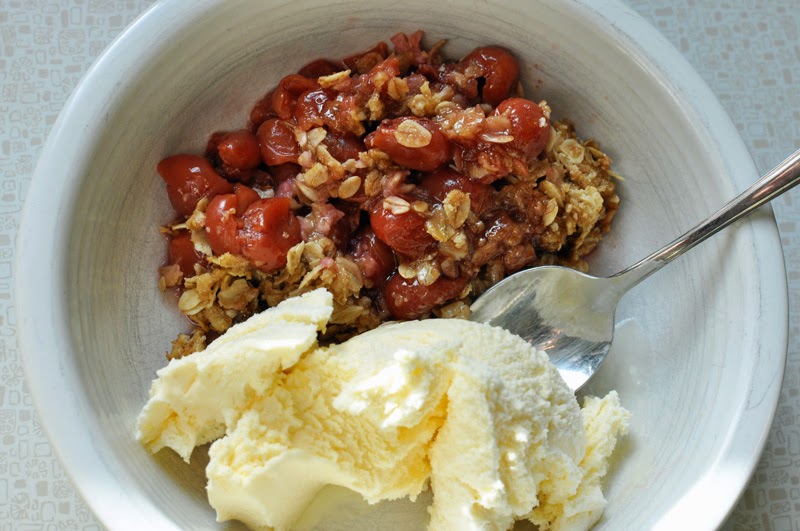
I was feeling so in the mood to cook on this warm spring evening that I even whipped up a batch of cherry crisp from canned cherries from last summer‘s crop.  I will share this classic recipe at a later date, because usually when I make this, I just throw it together without measuring – that’s what happens when you make a certain recipe often enough.


Coconut Red Curry & Veggies –
makes about 4 servings

1. In a glass 8″ baking dish combine: 1/2 a red onion, sliced3 medium carrots peeled and sliced, 1 – 2 cups of corn, and a bunch of asparagus stalks, sliced.  Toss veggies with sesame oil and then baked in a 425º oven for 15 – 20 minutes, or till softened.  (If you wanted to make things faster and not use your oven, pop ’em in the microwave for 5 to 6 minutes, or till softened.)

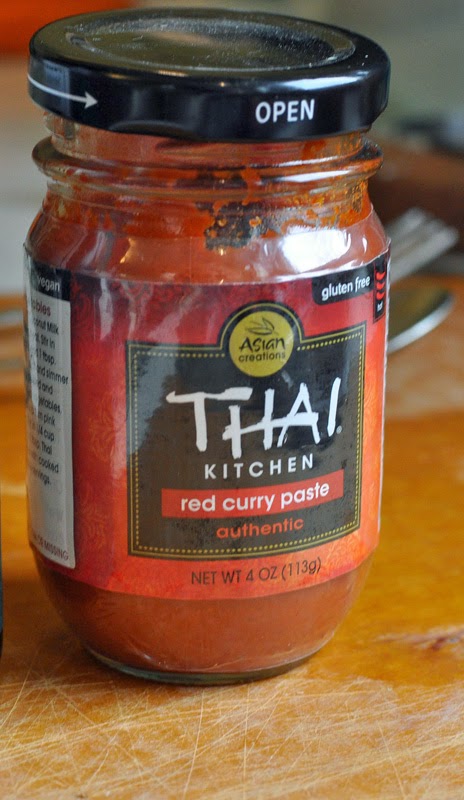
2.  While the veggies are cooking, prepare the curry sauce.  In a small saucepan combine: 1-1/2 cups coconut milk, 1 tablespoon coconut sugar or honey, and 2 tablespoons red curry paste.  Stir until well combined and cook over medium heat until bubbly and thickened, about 15 minutes.

3. Pour cooked sauce over tops of cooked veggies and stir. Serve over warm, cooked rice.

{Healthier} Coconut Berry Punch

I made this Healthier Coconut Berry Punch for the baby shower I hosted last weekend.  I was dissatisfied with all the punch recipes I kept finding that were full of soda pop, extra sugar, and unnecessary ingredients.  So, I set out to make a healthier version.  The result was so deliciously frothy, creamy, and fruity.  It tasted too good to be true!

The first step was to create the frozen punch ring.  This was made from only a few ingredients.  First was coconut ice cream.  This brand, Luna & Larry’s Coconut Bliss, is made from organic coconut milk, organic agave syrup, organic coconut cream, organic vanilla extract, and organic vanilla beans. The second and third ingredients were frozen strawberries and frozen red raspberries.

Allow the coconut ice cream to soften slightly and then beat together with thawed strawberries and raspberries.

Beat till smooth and berries are broken down.  If you need to save time, you could even pop all of this in the blender.

Pour into a pretty cake ring pan and freeze overnight or till solid.

Warm ring until loosened and then flip into a punch bowl.  Add cranberry juice, orange juice, and plain seltzer water.  Allow to melt slightly and then serve and enjoy.

Healthier Coconut Berry Punch – makes full bowl of punch – about 15 – 20 servings

1. Prepare frozen punch ring: in a mixing stand or blender (for finer texture) combine 1 cup defrosted frozen red raspberries, 1 lb defrosted frozen strawberries, 1 pint softened coconut non-dairy vanilla flavored ice cream.  Blend or mix until well combined.  Pour into cake ring pan.  Freeze overnight or till hardened.

2. Remove punch ring from freezer and allow to soften.  Flip ring upside down and into punch bowl.  Add 4 cups unsweetened cranberry juice, 4 cups unsweetened orange juice, and 4 cups seltzer water.  Allow to bubble and melt for a few minutes before serving.

Baby Shower + Gluten Free Dairy Free Waffles

Last weekend I hosted a baby shower for my sister, Caroline, and another childhood friend, Hannah.  Sadly, the few photos I took of guests turned out a hot blurry mess (trying to juggle too many tasks, methinks) and I don’t have one of Hannah.  So, Hannah, or the moms, if you have one of the three of us, I’d love to see it!  I don’t even have a photo of my sister, mom, and myself.  I failed miserably on photographing once people arrived.  😦

Due to my undying, pregnancy love of waffles, I opted for a waffle bar at this brunch.  This is a naked waffle, however for this brunch, a wide array of toppings were available.  These waffles are gluten-free due to the use of Bob’s Red Mill all-purpose baking flour and dairy-free due to my dairy-free buttermilk recipe.  

The first batch I made, the weekend before, had 1/4 cup of unsweetened shredded coconut thrown in.  I personally really liked the subtle coconut flavor and think that perhaps baby boy likes coconut, as I am not usually a coconut fanatic, but seem to be leaning that way these past few months.  I left the coconut out for the baby shower, instead using it as a topping.

The topping bar consisted of: sliced strawberries, sliced bananas, mixed berries, jam, honey, maple syrup, almond butter, Nutella, sliced almonds, sliced pecans, cinnamon, unsweetened shredded coconut, chocolate chips, and whipped cream.  I had every intention of making this topping bar look prettier, but alas better judgement of overdoing things outweighed my nagging sense of Pinterest style.

We set up a couple of extra tables and chairs to accommodate 12 guests.  Each table was dressed with vintage linens, china, silverware, and a floral centerpiece.
I made a delicious punch from juice and coconut ice cream – more on that later.  The glasses were a mismatched set – a thrift store find.

I sewed simple garlands of strips of paper and hung them from the chandelier as decor.

One grandmother-to-be, Katie, created these fun and funky paper flowers as decor.  They are so bright and cheery!  The cupcakes were gluten-free spice cake and oh so tasty!

This grandmother and grandmother-to-be enjoyed nabbing my on the go child for a quick and blurred photo.  Greta enjoyed the guests giving her gift to her future cousin.

Caroline and two of her childhood friends, Sami and Hailey, are pictured here.

I ate my fair share of topping drenched waffles at this brunch before we retired to the living room for a couple of shower games

whats.inside.your.purse.game

This game I prepared for the shower.  One thing I forgot to specify before beginning this game, and we ended up flipping a coin for: highest or lowest points win?  As Eric pointed out, have a trash can ready for the people like me who carry their entire life in their bags!  You buy a digital download of in my Etsy shop.

 Our friend, Hailey had a nursery rhyme trivia game and an old wives tale trivia game prepared with cute children’s picture books as prizes.

Greta slept through the gifts, but ended up enjoying the wrapping and filling of the gifts upon awakening.  We are still finding these lovely bits of crimped paper all over the house.

Gluten-Free Dairy-Free Buttermilk Waffles – makes 6 – 8 waffles, adapted from The Joy of Cooking, 1975

1. Sift: 2 cups gluten-free all-purpose flour1/4 teaspoon baking soda1-1/2 teaspoons baking powder1 tablespoon honey1/2 teaspoon salt, and 1/2 teaspoon gluten-free xantham gum. Add 1/4 cup unsweetened shredded coconut, if desired.  

2. Beat in a separate bowl until light: 2 egg yolks.  Add and beat 1-3/4 cup buttermilk replacement6 tablespoons melted margarine

3. Combine the liquid and dry ingredients with a few swift strokes.  Allow to sit while preparing egg whites.  Beat until stiff peaks form, but not dry: 2 egg whites.  Fold egg whites into batter.  Cook according to waffle iron and preferences. 

Banana Coconut Muffins

Oh my goodness, are these muffins ever delicious!  They have the flavor of banana, a slight crunch of chia seeds, and yet none of the gluten, dairy, refined sugar, or vegetable oils that most muffin recipes have.  I guess this recipe might be what the pinners are calling these days a clean eating recipe.  Well, you have to try them for yourself to believe how tasty they are.

There are only 7 ingredients (8 plus a couple tablespoons of water, not pictured here).  We ate them for breakfast one morning this week after I woke up at 4 AM, cleaned, ate breakfast, read the paper, and couldn’t get back to sleep and then decided to make muffins.  They are great served warm or room temperature as a snack the following day.

I’ve been busy, even though this blog has been quiet.  The new windows are installed and a breeze to use, make our views more beautiful, and keep the house warmer.  We’ve been working on painting trim and general cleaning up after construction.

I’ve also been busy hanging up more artwork.  It always takes me a while to figure out where I want artworks in a new space.  This wall space above the kitchen area is perfect for smaller artworks.  Now I am dreaming of colors and ways to give this space a face lift.  The previous owners painted latex paint over oil paint on the cabinets, which creates the wear without the charm look.

Ok, I’m off to do some prep work while Greta naps – I am hosting a triple baby shower brunch tomorrow morning.  Look for some more yummy recipes after this weekend.

Banana Coconut Muffins – makes 10 – 11 standard muffins
1. Preheat oven to 350°, prepare standard muffin pan with liners or grease with dairy-free shortening and set aside.  In a medium mixing bowl combine: 1-1/2 cups gluten-free all-purpose baking flour, 1/2 cup coconut sugar, and 1-1/2 teaspoons baking soda.
2. In another medium mixing bowl combine: 1/2 cup melted coconut oil, 2 ripe mashed bananas, 2 tablespoons of chia seeds, 1 beaten egg, and 3 tablespoons water.
3.  Make a well in the dry ingredients, add liquid ingredients and combine with a few swift strokes.  Pour batter into prepared muffin pan.  Place water in any empty muffin cups to prevent warping.
4. Bake in 350° oven for 15-20 minutes or until a toothpick inserted near the center comes out clean.  Cool in pan for 5 minutes and then remove muffins to cool on wire rack, or serve warm.

Violet Butterfly Watercolor

Phew, I hammered this artwork out in a single day.  It has been a long time since that has happened to work out well for me.  Last Saturday, since we didn’t make it to Minneapolis, I was at my in-laws’ house while Greta napped.  Loud hammering and nailing sounds were ringing through my house as the windows continued to be installed.  27 windows is no small feat!

I started with my taped off paper and a pencil sketch.

Next, I laid in the India ink on all the black parts.  India ink is perfect for areas that cannot bleed with the watercolor paint.

I closed my eyes for a few minutes while the ink dried and then began with the color.  I had a little more fun with this painting than the first.  So, it actually worked out well that Greta claimed the first butterfly painting.

Layers of watercolor interspersed with a few water, snack, and Olympic watching breaks and I was nearly finished by the time Greta awoke from her two hour nap.  During her post nap snack, I added the last few finishing touches.  My last task is to get this in the mail before next week, as my cousin’s little girl is due in March.

As always, prints and artwork are always for sale, please inquire by e-mail or through my Etsy shop, which is currently empty.  If you are interested in purchasing something you have seen on this blog, I will create a custom listing for you.  I also do custom commission pieces as well. 


Cat Constellation Watercolor + Winter, Windows, & Weekend

Cat Constellations, India ink, watercolor, and pen on paper, 9 x 12″, 2014.

Today we were supposed to be in Minneapolis for my cousin and sister’s baby shower, but the weather had other plans for us.

Due to a lovely storm that started as rain, turned to hail, and then became a very slushy blizzard, we stayed home.  The road reports north of Des Moines looked and sounded horrible and we decided to just not risk it.  Sadly, that means I can’t give Caroline her artwork today, but it also means I have more time for my cousin’s second artwork, the first having been hijacked by my daughter

I started with a simple watercolor wash for the background.  When it was dry, I added the pencil outline of the cats, railing, horizon line, and trees.

After filling in the pencil outlines with India ink, I added pencil outlines of April sky constellations.  These were detailed with gold ink and black pen for the constellation lines.

We will spend the rest of our weekend enjoying the view from our new windows – they were being installed on the hail day and through today and next week.

As always, prints and artwork are always for sale, please inquire by e-mail or through my Etsy shop, which is currently empty.  If you are interested in purchasing something you have seen on this blog, I will create a custom listing for you.  I also do custom commission pieces as well. 

Greta’s Butterfly Watercolor

Butterfly, watercolor on paper, 9×12″, 2014. 

This watercolor painting started off as a painting for another person having a baby.  Then, Greta discovered it and took it to her room so she could  hang it up.  She fell in love with it and said, “For my big girl room,” so many times that I caved and started another painting for the gift.  She is getting a big girl room soon, as we are moving her into the empty bedroom and turning her room into the nursery for her baby brother.  She is so excited for this change and this artwork just makes it all that more special for her.

 I started with taped off watercolor paper and a pencil sketch of a butterfly and flowers.

I used black India ink for all the black sections of the butterfly.  This way, I could use watercolor paint and watercolor pencils without fear of the black bleeding and smearing into the colors.

Lastly, I added color to the butterfly and flowers.  I used watercolor paints for the flowers and watercolor pencils for the wings of the butterfly.  My last step was to use gradations of a light blue-green for the background.

As always, prints and artwork are always for sale, please inquire by e-mail or through my Etsy shop, which is currently empty.  If you are interested in purchasing something you have seen on this blog, I will create a custom listing for you.  I also do custom commission pieces as well.  

Valentine’s Day 2014 – More BIG news!

Greta’s Valentine’s Day kicked off with a fun start at school.  She brought her crayons in to hand out to her friends.  She was so excited to have her first Valentine’s Day party – they made treat bags with stamps and traded Valentine’s.  Now my only challenge is to regulate the sugar consumption.

After an ultrasound appointment (yes, I know the sex of baby #2!), I was off to teach kindergarten students about making clay Olympic medals.  We used marker lids to create the rings of the Olympics.  They had so much fun, can’t wait to show you the end result after they are fired and decorated.  
Then, I had surprise flowers at work.  I didn’t open the card until I was home – hmmmm, who is Chandler?  Not sure.  Guess there is a twin to me somewhere out there who didn’t get her flowers from Chandler.  I called Hy-Vee, they were swamped, and said they’d look into it.  Meanwhile, the color and timing were a little eerie…

Greta and I made Valentine treats to surprise daddy when he got home.  Those are peanut butter M&M’s peeking out of those delicious oatmeal cookies.

One of Greta’s Valentine treats from the grandparents included small packs of sticky notes.  This girl and her sticky notes – she loves to creatively arrange them, write on them, and draw me pictures.  These are the mini modern artworks she made before dinner.  

Then, I moved on to tackling the job of sorting baby clothing while watching the Olympics.  These two large boxes and one large bag, contain most of the clothing that Greta has outgrown – newborn to 2T.  It is all being shipped off to Aunt Caroline who is expecting a girl.  So, Greta was right, we are having a boy!

Well, almost all of her clothing is going to Aunt Caroline.  Greta pulled a few of her favorites out to dress her doll.  

Lemon Chia Seed Blueberry Bread {dairy-free}

I made this delicious quick bread last Sunday during nap time, and it was gobbled up before work on Monday.  The chia seeds are a nice swap for butter and the typical poppy seeds.  The almond yogurt replaces the need for milk or sour cream, and the blueberries and lemon complement each other perfectly.  

Be sure to mix the 1 tablespoon of chia seeds with 1/2 cup of water in advance – at least 2 hours.  This gives the seeds time to do their magic and gel.  If you prefer to mix them in advance, just cover and store in the fridge.

The fresh blueberries and lemon flavor create a nice balance of sweet and tart.  I like to keep dried lemon peel around – I never know when I’ll need it and I am not always great about keeping fresh lemons in the house, as much as I adore lemons.

The batter is a lovely golden color.

This bread shapes nicely and looks no different than bread made with dairy.  You will, however, noticed that the bread is slightly denser and moister than quick bread made with dairy.  Do not under bake this bread – be sure to check with a knife or toothpick, even if your timer has run out.  Enjoy!

Lemon Chia Seed Blueberry Bread – makes 1 loaf

1. At least 2 hours prior to baking, combine 1/2 cup water with 1 tablespoon chia seeds.  Allow to stand at room temperature.  If preparing the day before, cover and place in refrigerator.

2. Grease with margarine, and lightly flour a loaf pan.  Preheat oven to 325º.  In a medium bowl combine: 1-1/2 cups whole wheat pastry flour, 1/4 teaspoon baking powder, and 1/8 teaspoon baking soda and set aside.

3. In a medium mixing bowl or with mixing stand, beat together 1 cup sugar, prepared chia seed mixture, 2 tablespoons lemon juice, zest of 1 lemon OR 2 teaspoons dried lemon peel, and 1/2 teaspoon vanilla.  Add in 3 eggs, 1 at a time, beating well after each addition.  Scrape bowl frequently.  Alternately add flour mixture and 6 oz of almond yogurt to the chia mixture, beating on low speed after each addition, just till combined.  Scrape sides frequently.  Fold in 1 cup of fresh blueberries.  Pour batter into prepared pan.

4. Bake in a 325º oven for 60 to 75 minutes or until a knife or toothpick inserted near the center comes out clean.  Cool on rack for 10 minutes.  Remove from pan and cool completely before slicing.

BIG news!

There have been some interesting developments around here lately.  Let’s see if you can add it all up.  
1. A large increase in the consumption of my favorite food on earth – Pad Thai. 
2. A rise in consumption of another favorite food – waffles.  (Hence the waffles recipes that have been on here not once, but twice!)  I told you I would explain those waffles, didn’t I? 
3. An increase in lazy evening couch time and less late nights.  
4. An uptick in my incidents of baking.  (My dad always had a theory about this…)
5. A sudden urgent surge in art projects. 
6. Despite finding out that we can now purchase one of my favorite beers (from Utah) on earth in Iowa

7. I am drinking these (fabulous) cranberry mocktails.  
What does this all mean?
It means Greta has some studying to do in the next 5 months or so.  Why you ask?
She’s delighted to say a brother or a sister is on the way!  She’s been repeatedly asking for a boy though.  This explains the drop in creative blog postings for a while this fall/winter.  I just didn’t have the energy for a while there.  
However, now I am feeling great and enjoying the second trimester burst of energy.  And what they say is true, the second one does appear much faster than the first.  Stay posted for an inevitable return of this blog towards all things mommy.