Sun Prints

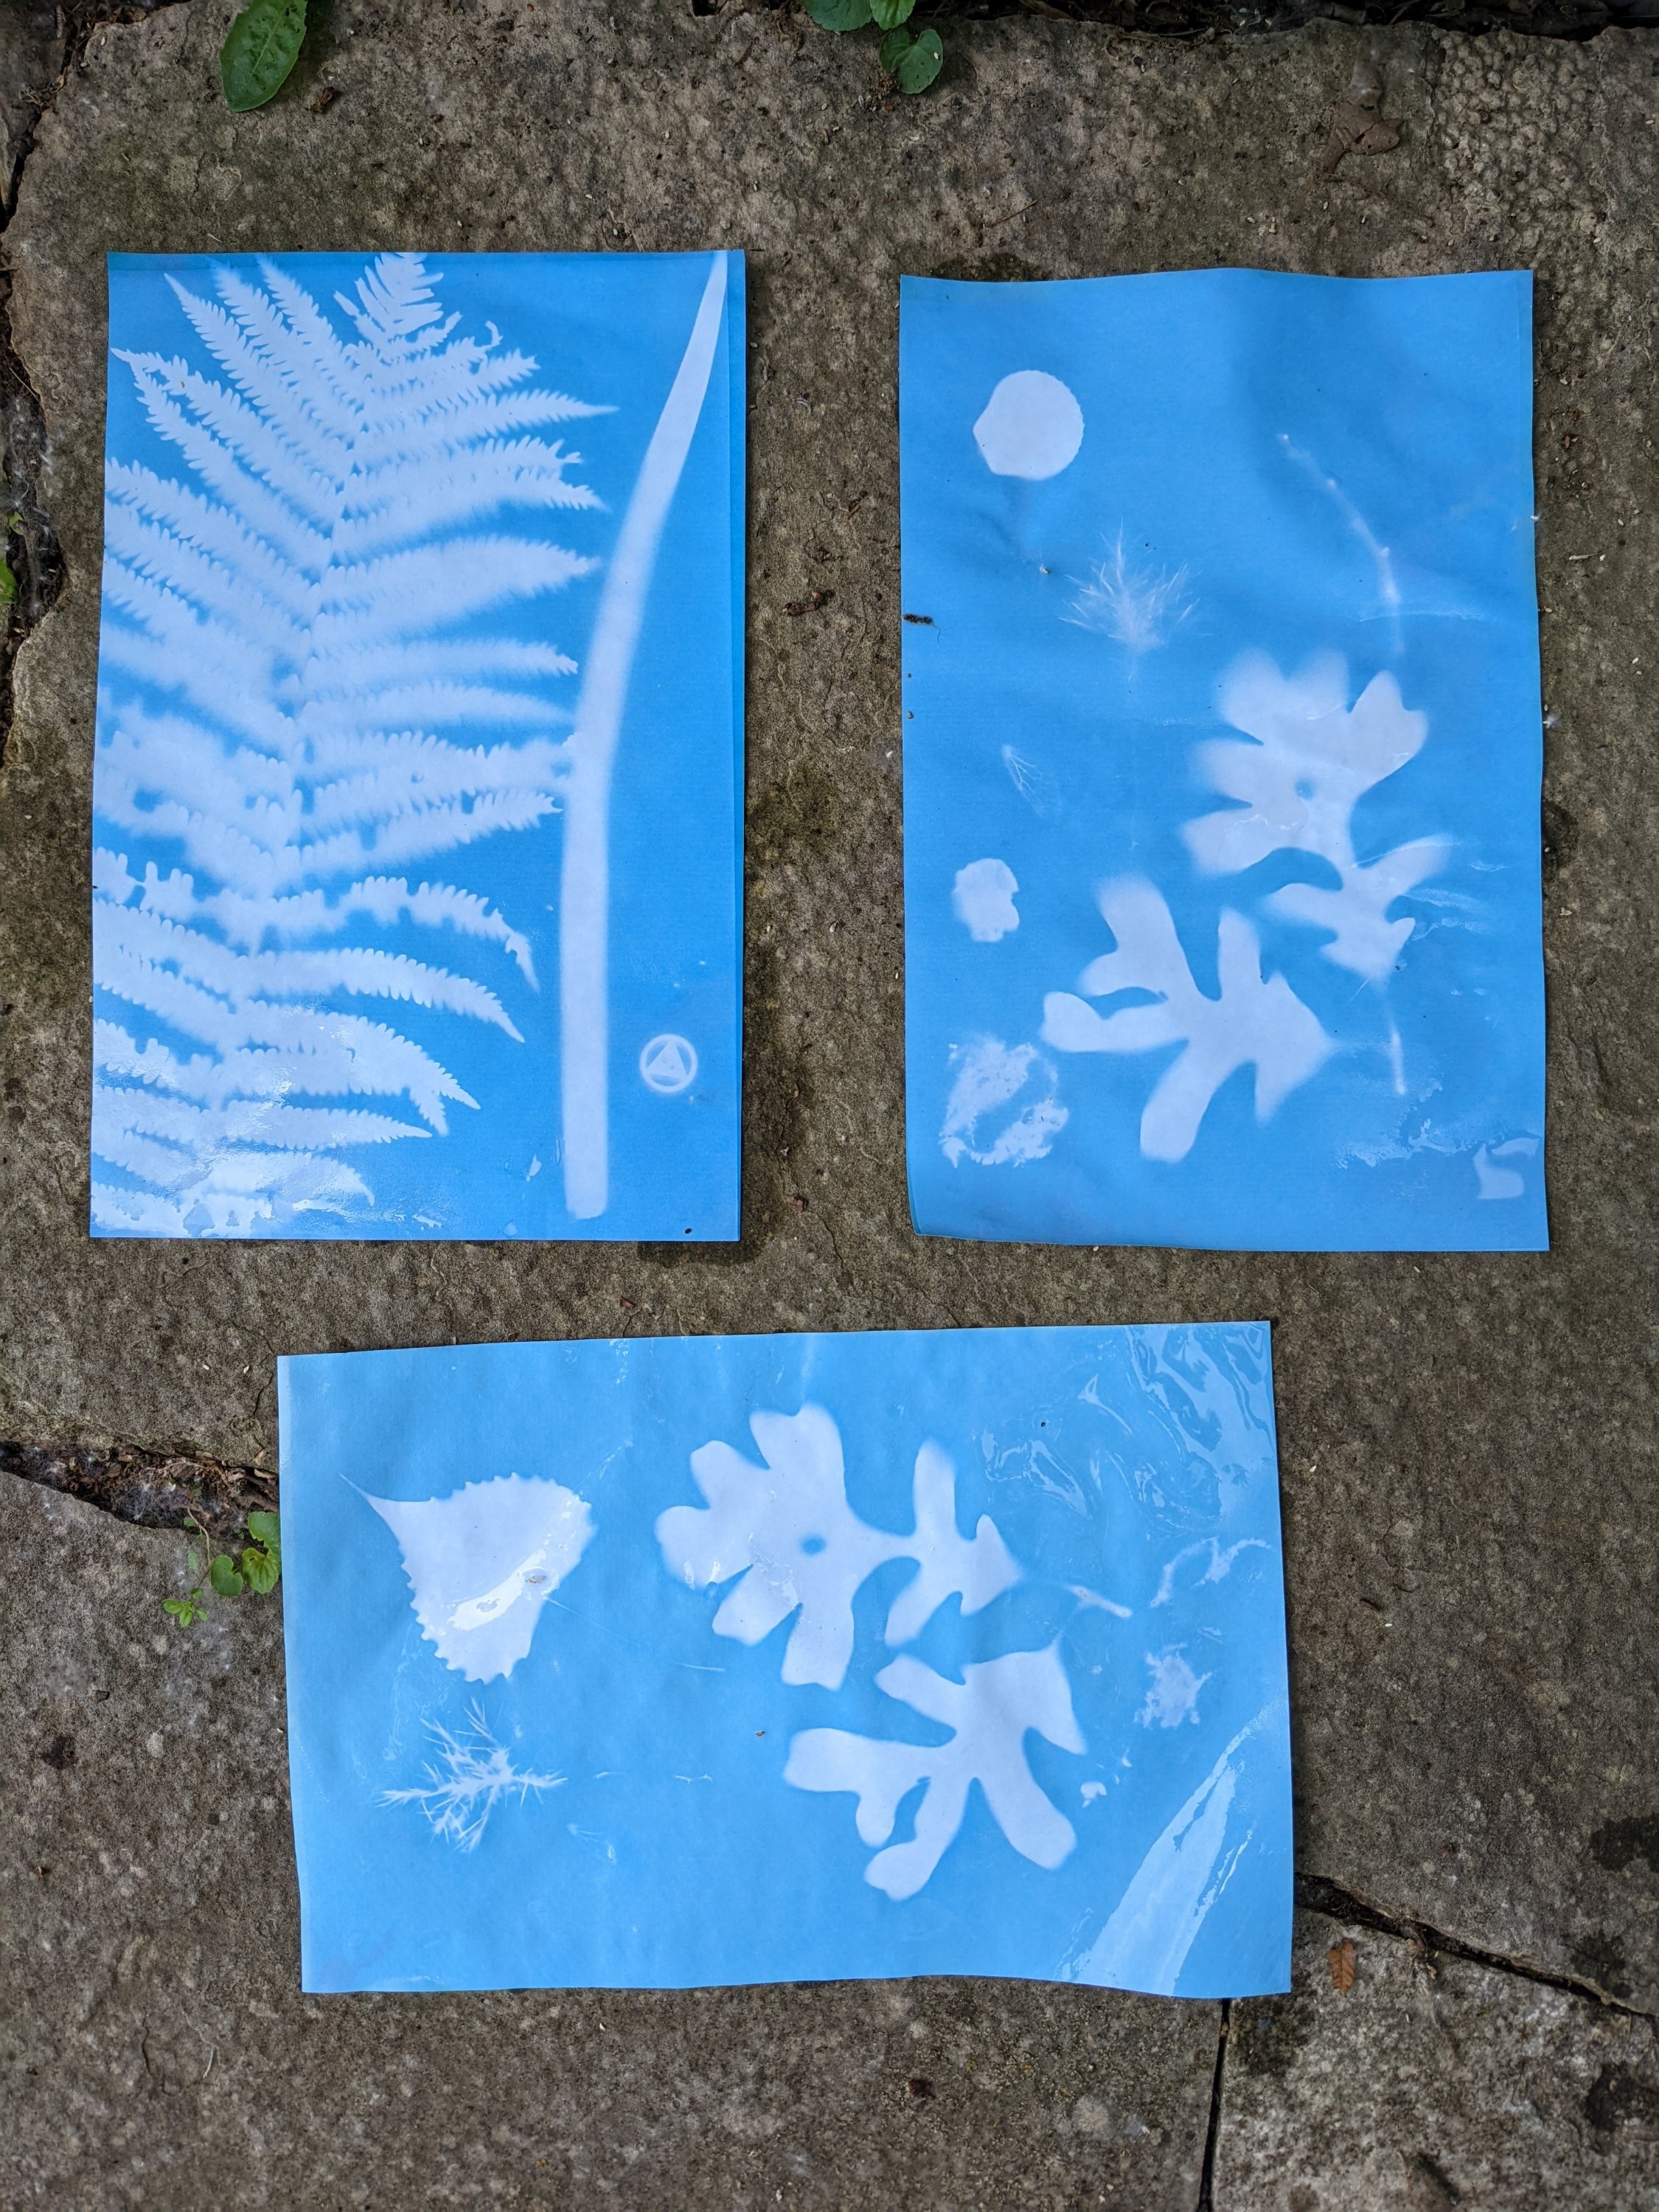
I always strive for outdoors and creative play rather than screen time, in an effort to prevent my kids from becoming screen zombies during the most beautiful weather of the Midwest summer. I don’t know about anyone else’s kids, but mine turn in heaps of sobbing and arguing messes after any amount of screen time. Nature art to the rescue. Specifically sun prints, also known as cyanotypes. What I love about these prints is that they are process-oriented. All of my favorite creative activity for kids are process-oriented, meaning the process is truly more important than the outcome. There is no copying of a subject (for example, we aren’t all trying to create a print of a smiley face).

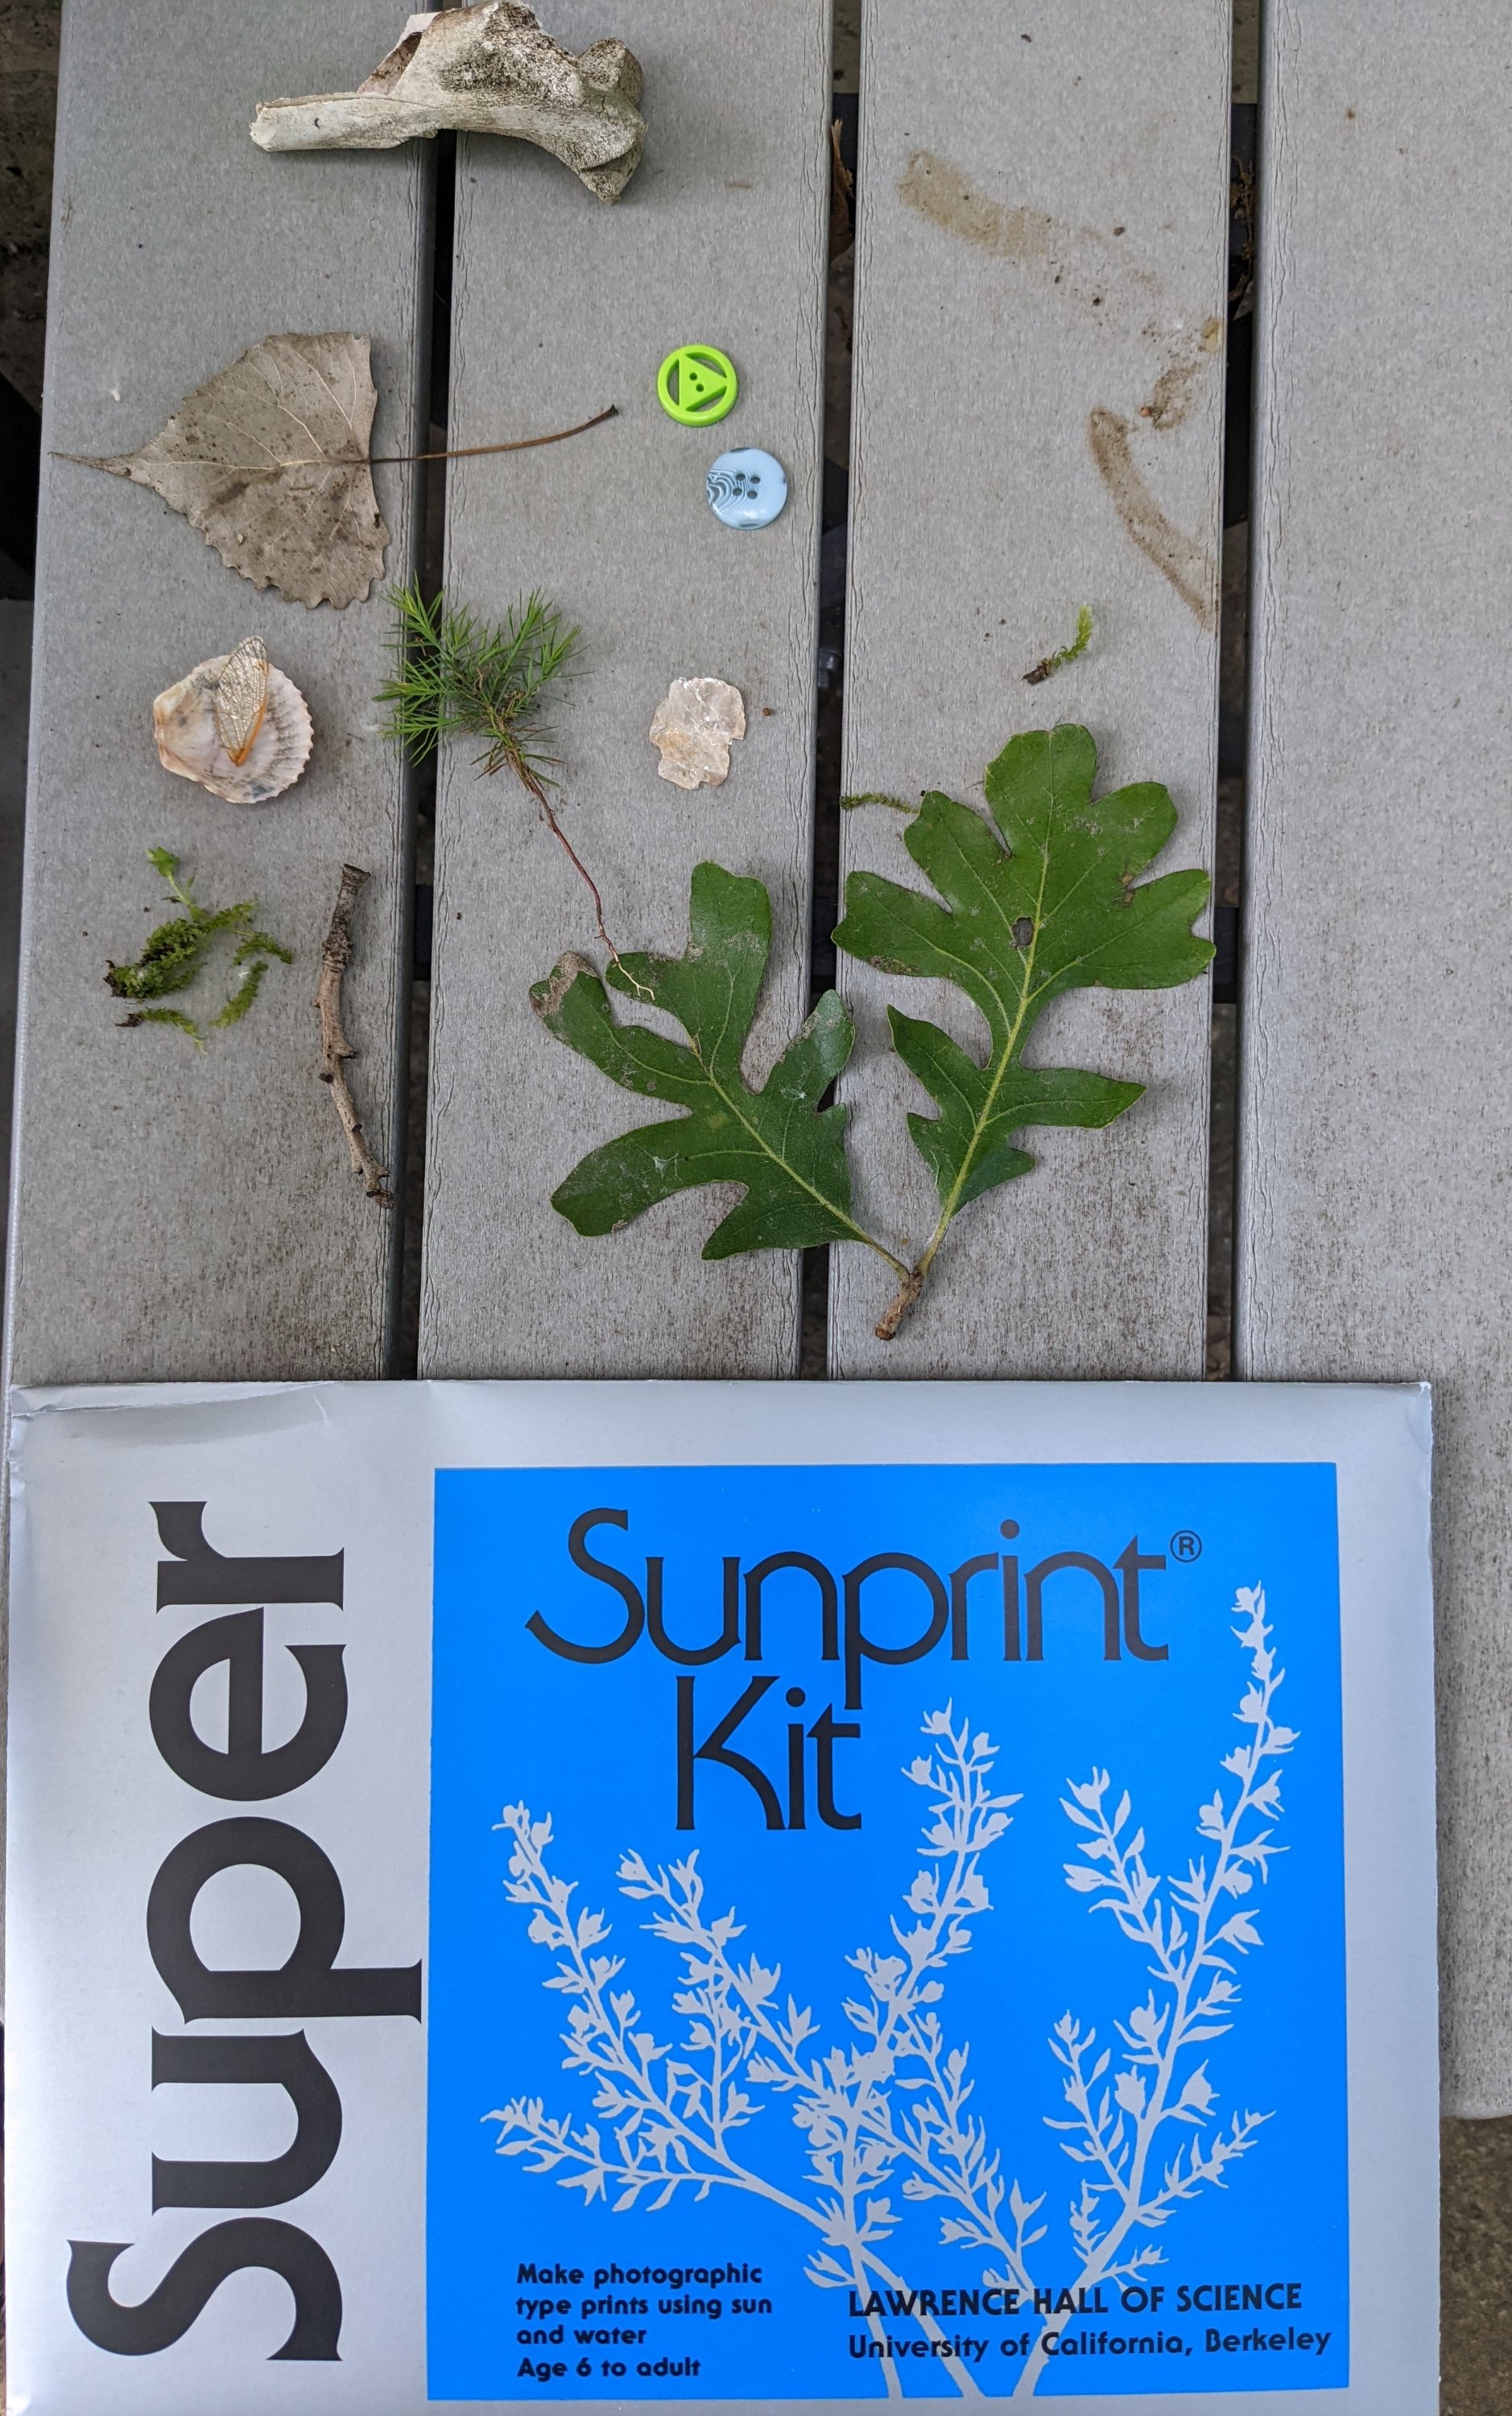
We started by gathering some materials. Look for items that have differing edges, negative space, translucent, and mostly flat. Buy your own Sun Print paper or create your own. You can see some historical examples and learn about the history of the cyanotype from the Getty.

The directions are simple to follow and on the back of the package. My kid appreciated the visuals in these directions.

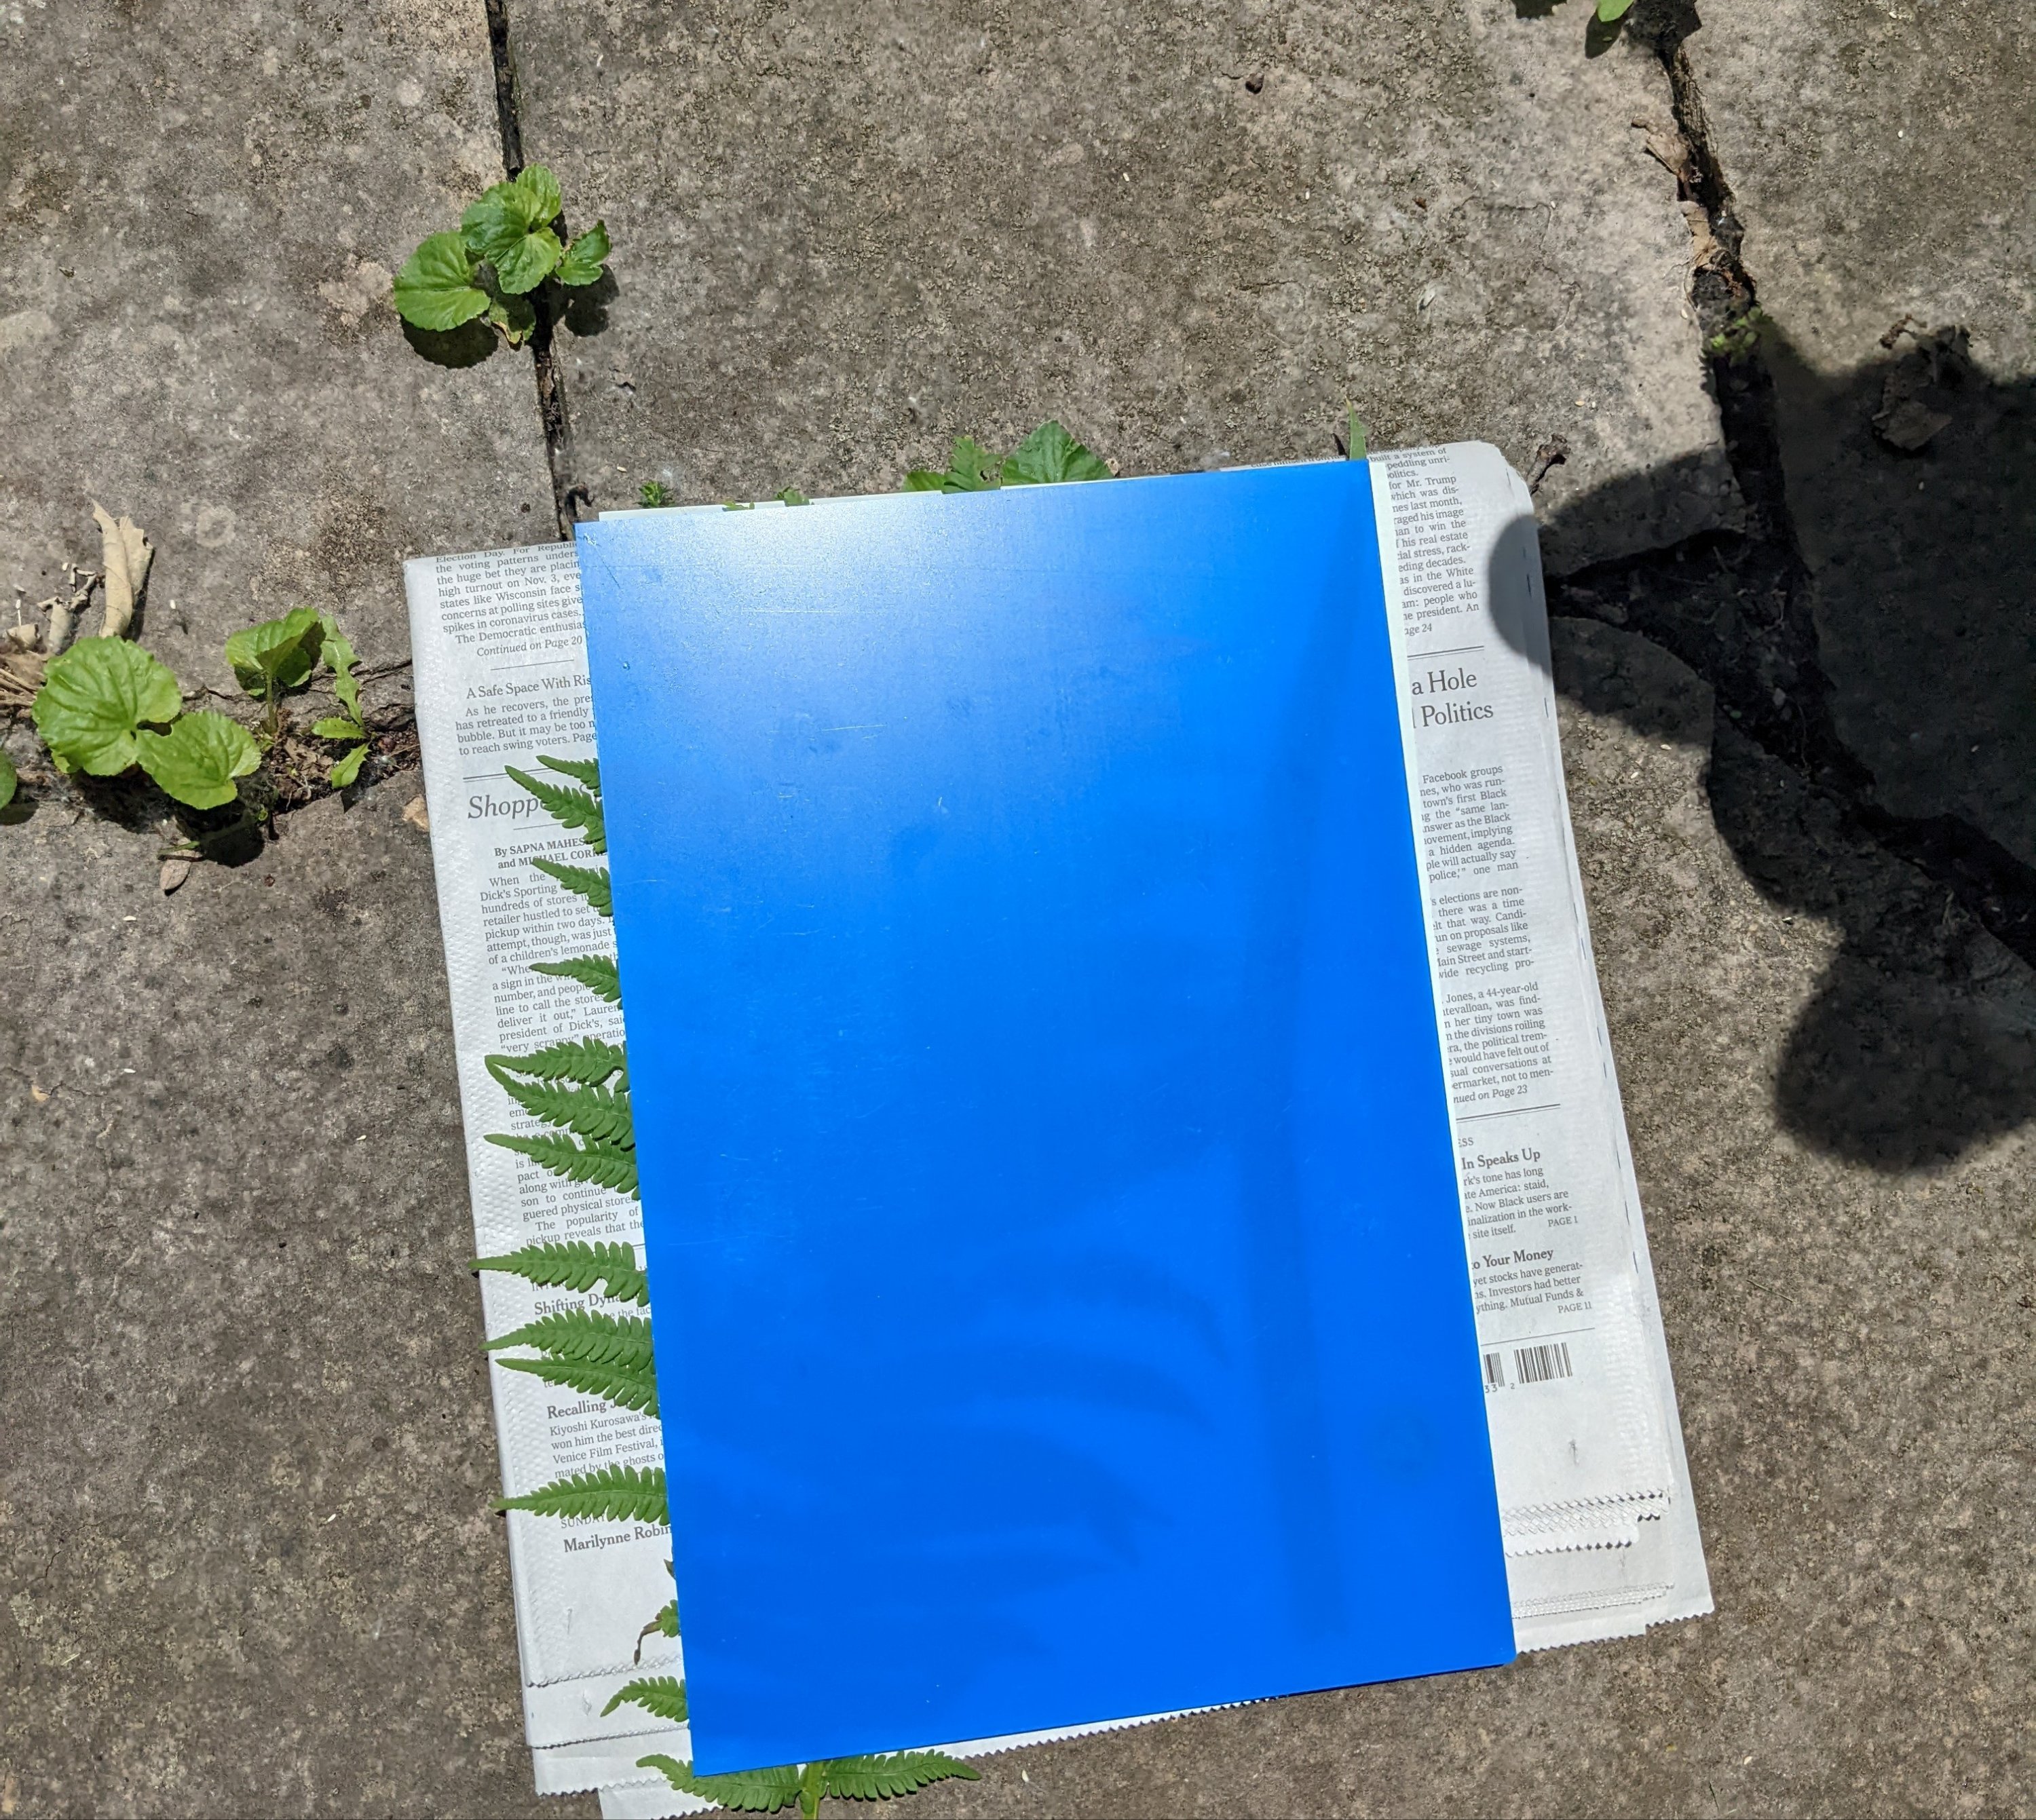
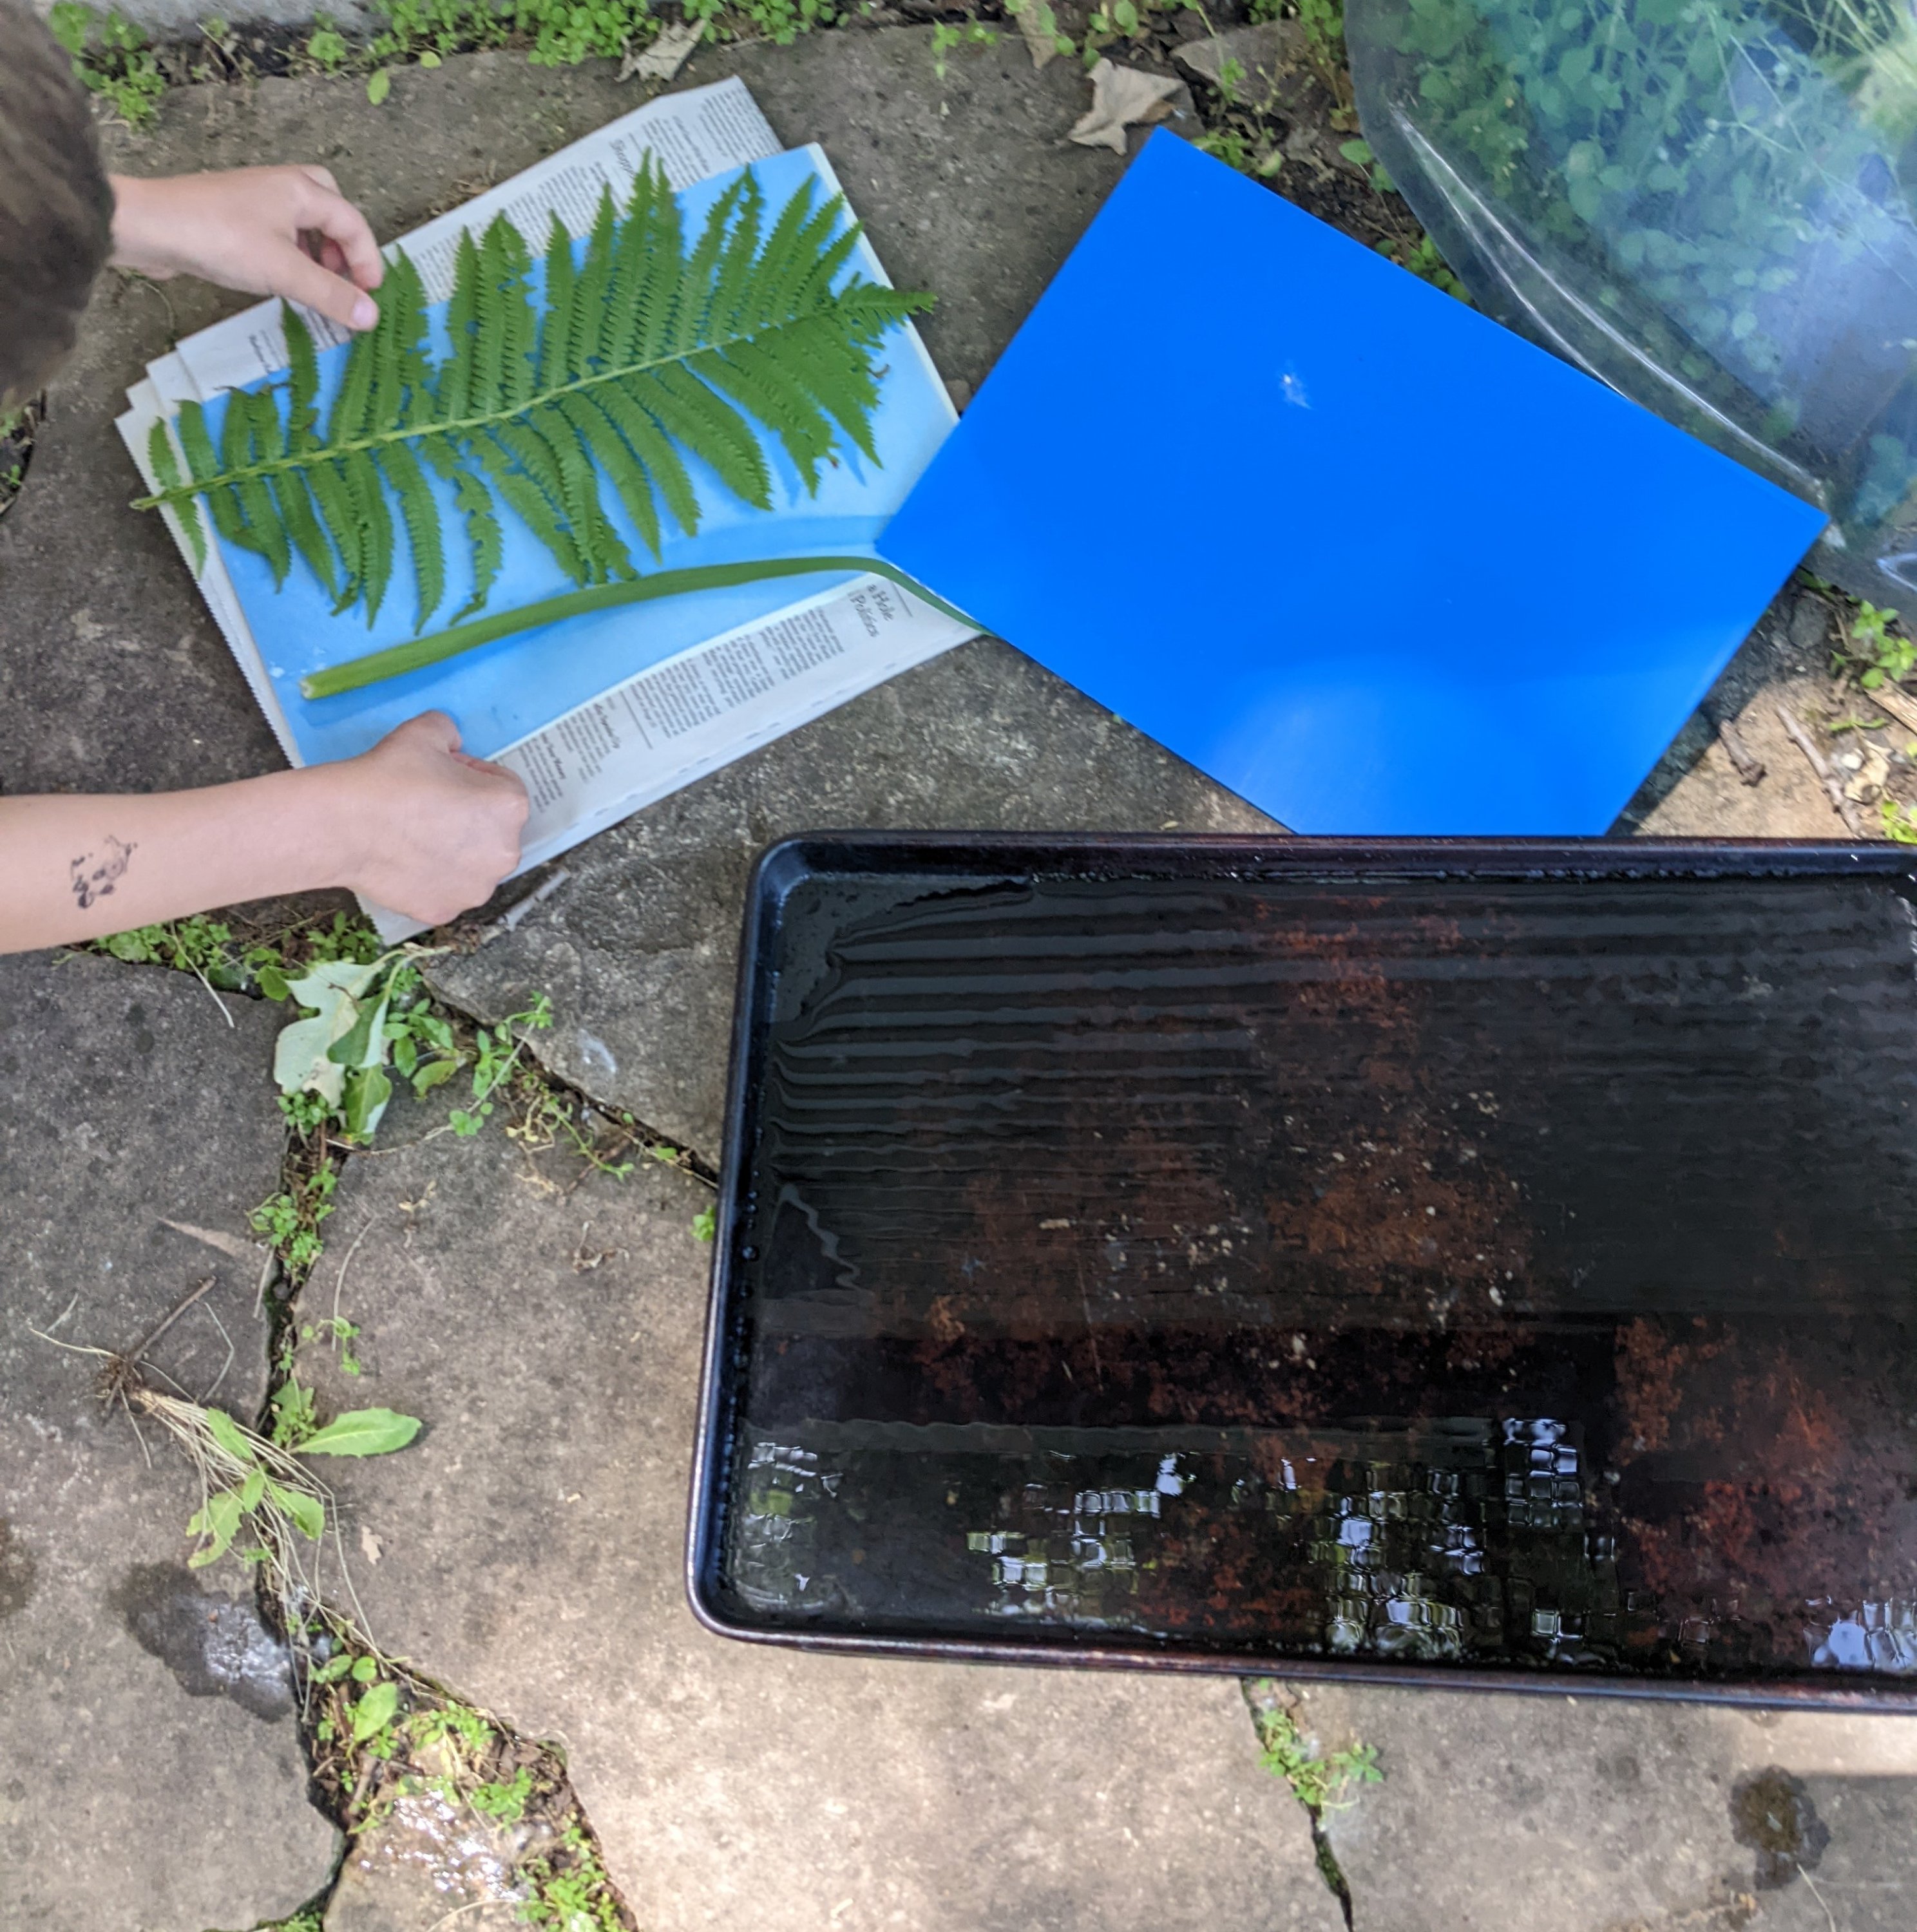
We used newspaper sections, but cardboard works too. Working in the shade, place the sheet of cyanotype paper on the newspaper, blue side up. Arrange your items quickly. Place the piece of plexiglass (blue and provided in this kit) on top. Place in the sun for 4-5 minutes. Watch the print to see when it turns white. I used a small section of the edge of the paper to ensure I did not over expose the paper.

When it is ready, quickly take items off and slide the cyanotype paper into a tray of water.

I flipped it upside down and into the water for 1 minute. These will make great cards, artworks on their own, backgrounds for paintings or collages, or even decoupaged into a shadow box. Allow them to dry flat. If they are wrinkly, set a stack of books on top of them once they are dry.

Our next step is to try this with fabric!

Advertisement

Winter Mixed Media Art

I have been squeezing in studio time as much as I am able to these days. I keep stalling out on a now years-long project with a winter solstice theme. I am more than halfway through the project, however I have a few images in this series that just need a complete do-over.

This was not a do over artwork, but the direction of collage mixed with watercolor is working for me. It is a style that I will certainly continue throughout this project.

Nebraska Embroidery

With the start of the school year looming, I’m trying to wrap up some unfinished projects around here. This particular embroidery was started over spring break. I tried to add a few details, but ultimately ended up ripping them all out, and instead opting for a simple landscape. You can find it for sale here.

Last March we tried to head out to Fort Collins, Colorado for a change of scenery. Record snowfall delayed our trip and we ended up staying in Kearney, Nebraska for a night.

To my absolute delight, we accidentally ended up in the middle of sandhill crane migration and Kearney happens to be the epicenter of this colossal migration.

Each year, approximately 600,000 sandhill cranes migrate through Nebraska, specifically along the Platte River. The Platte River is wide and shallow, creating the perfect place for cranes to spend the night. During the day they feed on corn from the nearby fields.

Kearney has a spectacular crane viewing park at Fort Kearney State Recreation Area– it has campsites, a playground, plenty of parking, trails, and a bridge to watch cranes coming in for the night.

We found food, viewed cranes, and spent the night in Kearney, due to the interstate being closed. We got up the next morning and saw thousands more cranes and eventually we did make it to Colorado. Admist the human frustrations of road closures, the cranes were a welcome moment of awe and something I’ve always wanted to witness. Their journey is a wonder that has been happening for thousands of years and a timely reminder to slow down and pay attention to the beauty outside our car window.

Waffle Series Pronto Prints

Chicken & Waffles, Pronto Plate Print, 8 x 10″, 2021.

This is another pronto plate series I printed during my spring printing class at the Des Moines Art Center. The inspiration comes from my family’s love of eating waffles and our recent addition of a flock of ten hens for egg-laying purposes.

My work station.

I started with a printing the waffles. Pronto plate is a modern take on lithography – one starts with a drawing using permanent marker on special pronto paper. Then, you wet the paper with a sponge. Next, you roll your lithography ink over the inked drawing. Repeat wetting the paper and rolling the ink until the ink covers the ink drawing. At that point, the plate is ready to be run through the printing press and onto wet printmaking paper.

After the waffle images dried, I was ready for the second layer. I chose the same dark blue for the waffle and the chicken, so I would save time not cleaning up between colors (work smarter, not harder).

I marked on my plate where I wanted to the chicken to overlap the waffle and ran half my waffles through with chickens and eggs on top.

I ran the other half of my waffles through with mulberries & mulberry syrup on top. As a kid, we always ate homemade mulberry syrup on our pancakes and waffles. This color blue was perfect for the color of ripe mulberries!

Cheese & Macaroni

Cheese & Macaroni I & II, pronto plate printmaking, 8×10″, 2021.

I just wrapped up a printmaking class at the Des Moines Art Center. I’ve done relief printing most of my life, but wanted to dive deeper into other printmaking techniques.

My new-found printmaking love is a modern lithography technique called pronto plate. The pronto plate is drawn on with Sharpie and then taped to a piece of plexiglass. The plate is wet down with a sponge between each inking. The ink sticks the the toner in the Sharpie, but not the paper. Then printing plate is then run through the printing press.

First pronto plate attempt.

I did several series of this technique. It’s a process I really enjoyed and it gave a clean, crisp image. The kind of image I always wanted to achieve via silkscreen but couldn’t seem to ever attain.

Happy (belated) Valentine’s Day

COVID era Valentine’s.

I’ve been using printmaking to make Valentine’s since I was a kid – maybe started this tradition when I was in 3rd grade? My parents were always into printmaking and they thankfully taught me linocut early on.

This year I had to go with the masked theme. Some of these will be available in the shop section of this site soon!

I started with the soft-kut linoleum blocks. This is a fabulous material that my first grader even handled with ease. I love using a thick line of marker to ensure I don’t cut too much away.

I used watercolor paintings as the background of my prints. Rubbing alcohol and salt were fun additions to the paintings.

Both my kids were hooked – even working at breakfast instead of eating.

My son created a mask and heart design, but separately. The kids figured out they could cut designs on both sides of their printing block. My daughter did a cat and hearts.

My daughter forgot to make her carved words mirrored backwards, and didn’t catch it until her proof. She rolled with it and adapted her design – a great example of a beautiful oops!

Neuron

This neuron is the second round from a much earlier embroidery that was never completely satisfied with the outcome.

I started with the leg of some worn out pants. This gray would prove to be a good choice when I decided to make this a functional artwork and not a wall hanging.

The pouches are made of recycled cotton and come from Dick Blick. They come in a handy variety of sizes, but only the gray color.

My starting point embroidery.

At some point I’ll revisit the synapse concept, but for now the marvelous structure of a neuron works for me.

Superior Rocks

Superior Rocks, mixed media on canvas, 12 x 14″, 2021.

Oof this artwork was a long time in the making. It was one that took so much waiting between layers and materials that I stalled out many times.

The rocks are a mixture of magazine collage, collage from paintings, and real lake stones.

The water is layers of tissue paper, acrylic paint, and gel medium.

Awaiting a layer of matte medium to dry.

Winter Tabby

I don’t always remember to document the process of my art, but collage lends itself particularly well to this.

I always have an image in my head when I begin an artwork. My perfectionism hinders my speed at times. For whatever reason, I find that collage is the media where the outcome most often matches the initial vision. 

This Tabby winter scene is an artwork I am preparing for an online auction benefitting my church. I’m trying to finish two more artworks this weekend. Deadlines are good for me!

Collage: Getting Started

Collage is one of those art forms that kids naturally understand.  As adults, I think it is best if we give them access to materials and then get out of the way.  However, as children spend more time practicing with collage, their work will become more sophisticated and they will need additional supports with materials, composition, and next possible steps.  In this post, I will introduce the basics, along with some student examples.  Future posts will dive into more detailed collage techniques. Collage truly is my favorite media to work with, as an artist.

Here is a basic how-to poster I created for my classroom on collage.

Some of my favorite collage materials are:

  • magazines
  • aluminum foil
  • doilies
  • lace
  • string
  • wax paper
  • tissue paper
  • tape
  • old photographs
  • tickets
  • receipts
  • junk mail
  • old book pages
  • found objects: paper clips, twist ties, playing cards, pop tabs, toothpicks, things in your junk drawer
  • fabric
  • plastic bags, fused or not
  • wallpaper
  • wrapping paper
  • newspaper
  • cardboard
  • old greeting cards
  • maps
Collage shows exuberance like no other media, in my opinion.

Collage is really all about layers.  Helping students to see that there is potential in their stacking of shapes, objects, papers, and even with their layering of paint or drawing will help broaden students’ ideas of what a collage is.

My daughter made this collage with torn pages from an old book. She explored adding oil pastel, watercolor, and India ink.

Sometimes the sandwich or pizza analogy is helpful when planning for a collage. Students should ask themselves: What is my first layer?  What is my next layer?  What will be my top layer?

There are so many terrific different types of collage to explore.  More coming soonish on: photo montage, dioramas, tissue paper collage, and torn paper collage.