Peanut Butter Lover’s Brownies

pb.brownies

With the abundance of snowy, sub-freezing weather, numerous sick days from all members of the household, and general lack of outdoor time, these peanut buttery bars have been baked several times in the past couple weeks.  They have been prepared with both boxed brownie mix and from scratch.  I can happily report that both ways are equally tasty, but the box is ready in a jiffy.  Both baking methods are at the bottom of this post.

chocolate

When I made these brownies from scratch, I had no unsweetened baking chocolate on hand.  So I whipped up my own using the substitution of 3 tablespoons unsweetened cocoa powder mixed with 1 tablespoon melted butter, per 1 ounce of needed unsweetened baking chocolate.

marbling

The best part of this recipe is that your marbling doesn’t have to be perfect – the baking process will cause your peanut butter to practically sink into the batter and make delicious pockets of peanut buttery goodness.  Plus, you can cover any ugly spots with peanut butter chocolate candies.  Be sure to use smooth peanut butter – if it is very thick you can stir in some water.  However, I have found that using the all-natural, no additive peanut butter works very well, as it often has a higher natural oil content and is easier to spread and drip to make the marbled effect.

m.m.sI set my cabin fevered child to work decorating with peanut butter candies.  Delighted, she only reserved a few to eat.  These brownies never last long in our household and the best part is how easy they are to make.  Not a peanut butter fan?  Swap out the peanut butter for caramel or butterscotch sauce.  You are welcome!

Peanut Butter Lover’s Brownies

To make with brownie mix:

1. Prepare 1 box of brownie mix as directed.

2. Drop dollops of creamy peanut butter on top of batter.  Use knife to draw vertical lines through batter, and then use knife to draw horizontal lines through the batter, creating a marbled look.  Top with chocolate peanut butter candies.  Bake as directed.

To bake from scratch: (Better Homes & Gardens, 2002)

1. In a medium, microwave safe bowl, melt 1/2 cup butter and 3 ounces unsweetened chocolate, coarsely chopped (or substitute additional 3 tablespoons butter and 9 tablespoons of unsweetened cocoa powder).  Stir well and allow to cool.

2. Meanwhile, grease an 8x8x2-inch or 9x9x2-inch baking pan; set aside.  Stir 1 cup sugar into cooled butter mixture.  Add 2 eggs, 1 at a time, beating with a wooden spoon after each addition just until combined.  Stir in 1 teaspoon vanilla.

3. In a small bowl, stir together 2/3 cup all-purpose flour and 1/4 teaspoon baking soda.  Add flour mixture to chocolate mixture; stir just until combined.  Spread batter into prepared pan.  Drop dollops of creamy peanut butter on top of batter.  Use knife to draw vertical lines through batter, and then use knife to draw horizontal lines through the batter, creating a marbled look.  Top with chocolate peanut butter candies.

4. Bake in a 350° oven 30 minutes for 8-inch pan or 25 minutes for 9-inch pan.  Cool on wire rack.  Cut into bars.

Valentine Cards 2015

stained

My hands are stained pink tonight – magenta pink.  Why? Because of my love for hand-made Valentine’s and my daughter’s blossoming creative process.

sketch

it all started with her asking me, “Mommy, when is Valentine?”  I told her it was next weekend – 7 sleeps away and her reply was, “I need Valentine’s!”  I asked her what she wanted to have on her Valentine cards and she said, “A horse with rainbow mane and tail, clouds, and standing on a rainbow.”  Wow.  It is like I was looking at my childhood self.  I will be honest, I was kind of hoping to hear robot, frog, car, or robotic frogs in cars.  I wasn’t expecting this!  It was a few hours later I realized she was inspired by a card she received – I was slow to put the two and two together.

Anyway, I got to thinking.  I realized I had enough printmaking supplies to outfit her entire class in Valentine cards, and so decided to go with it.  I have made quite a few Valentine’s Day cards myself in the printmaking media.  Printmaking is one of the easier ways to make hand-made but mass-produced artworks, if you ask me.  All you need are linoleum blocks, a cutting tool, a brayer, and ink.  This Speedball Deluxe Block Printing Kit makes it so easy to get started on printmaking!

more.carving

Here is the almost finished linoleum block.  I kept this block smaller, so from sketch to this point only took me about an hour.  The trick is to use a warm iron to soften the block – this makes for easier carving.

inkedThe next step is to make a test print, or an artist proof.  These AP prints are crucial for finding areas that were not cut in the desired way the first time around.

AP1

AP #1 shows a few areas to be improved upon.  Where is the eye?

Ap2Phew, looking better now (no pun intended).  After the AP, I always wash the linoleum block and pat it dry.  The leftover ink stains the block, making the correcting process that much easier. Oh, and it stains skin too, so be more mindful than I was during clean-up. However, this water-soluble ink cleans up easily in soap and water.

valentine

The finished (for now) print.  Greta and I will be collaborating even more on these prints tomorrow – I assumed she would add her own coloring to finish the rainbows.  I can’t wait to see how she makes these prints her own, and I am excited to show you my plans for the adult version.

Collaborative Turtle Drawing

My New Year’s Resolution of creating something at least once a week is chugging right along with great success.  Both kids went down for a nap at the same time (!) yesterday, and I managed to get started on a still life drawing in color pencil, which I will show you at a later time.  Greta came creeping down the stairs while I was about half way through this drawing.  She climbed up on a stool next to me, still dazed from sleep, to see what I was working on.  She proceeded to trace her finger over the areas I had already added color to, and ask me, “How you do this, Mommy?”  It was then I realized that she didn’t remember the last time she had seen me work on my own art.  I have only worked on my own art after she was in bed, and I have drawn things for her at her art table, but she did not recall Mom making her own art.

I explained to her that I make artwork on my own sometimes and that I was using color pencil and drawing from observation, meaning I was looking at a something while I drew it.  She asked me if she could draw something in my drawing book with my pencils.  I flipped to a new page and asked her what it was she wanted to draw.  Her reply was, “A turtle.”  Greta is just a little fascinated with turtles and even calls her brother a turtle.  She was also a turtle for Halloween this past year, and we created a detailed papier mâché turtle shell, something which I now realize I never did get around to posting.

She then asked me to find an image of a turtle on my phone, because, “It is easier to draw when I look at it.”  I found two turtle images for her to look at, one of which was eating a strawberry.

outline

My sweet 3-year old used my drawing pencil to draw this outline.  Then, she told me I should color it in.  I was a proud art teacher mama to see how big and confidently she drew this turtle outline!

turtle.collabShe politely asked me to add the strawberry and asked if she could color in that part.  I obliged and colored in the remaining parts of the turtle.  I have to say, this was one of the more exciting artworks I have done in a long time.  I was thrilled to make this artwork with her and have been hoping for just this kind of collaboration for a couple of years now – ever since a friend directed me to the blog post on the Busy Mockingbird, on Collaborating with a 4-year old.

Southwestern Pinto Soup

pinto.soup

I made this heavenly toasty soup earlier in the week in my way too dusty slow cooker.  I need to brush it off and use it more often, it’s just too luxurious to come home to a house that smells deceivingly like a laborious meal.  The slow cooker meal feels almost magical, and I get giddy just thinking about it – when I walk into my home after work and after three trips from the car, with two hungry and exhausted kids, 3 ravenous animals, and my hangry self.  The very last thing I want to do on a weeknight is cook dinner – we’ve been surviving on multiple days of leftovers and frozen vegetables for the past 6 months.  My toddler has been known to say, “Mommy, we been having this last night.”  True.  Eat it or go hungry kiddo, sorry.  Hence the sudden drop in healthy meals on this blog.

pinto.beans

I cooked up the rest of my dried pinto beans earlier in the week for a random Monday night of nachos.  Leave it to the Bon Apetit Instagram feed to fuel that hankering.  So I had this heaping container of beans and no idea how to use them all, and so this soup was made.  I really do love this image of the beans, by the way, it makes me want to paint it on a 13 foot canvas.  My problem with the blog is this – I love to cook, I love baking, and I cannot turn off my artist eye.  So, often, I halt everything and capture the image, even if it is a container of glossy, slimy, and borderline gross container of pinto beans.  I cannot tell you how many times I have heard my toddler say to me, “Mommy, what are you taking a picture of?”

soup.base

The base of this soup consists of three ways of tomatoes – canned by yours truly, paste, and fresh – and vegetable broth.  This soup is a vegetarian recipe and could easily be made vegan. Check out the recipe below.

knivesMy only other news is that we are slowly but surely organizing our lives in Iowa.  Funny how a move and a baby can throw your whole world into chaos.  😉   I love my new Ikea Magnetic Knife Strips but am still dreaming up ways to beautify gut my kitchen.

orange.kitchen

This kitchen speaks to my orange-loving soul!

Southwestern Pinto Soup with Cornbread Dumplings

Saute´ until soft:

1/2 yellow onion, diced and 3 cloves of garlic, minced.

Combine with onion mixture in slow cooker:

2 cups cooked pinto beans, 1 can diced tomatoes, 2 cups vegetable broth, 1 teaspoon chili powder, 1 teaspoon ground cumin, 1/2 6 oz. can tomato paste, 2 chopped fresh tomatoes.

Cook on high for 5 hours or low for 7 hours.

30 minutes before serving, mix up dumplings.  In a small bowl combine:

2 tablespoons of water, 1 egg (to make vegan, swap egg for 1 tablespoon ground flax-seed with 3 tablespoons water), and 8 tablespoons corn flour.

Drop spoonfuls of batter into hot soup, cover and let cook 30 more minutes.

Serve with sprinkling of cheese and splash of lime juice.

New Art Apron

finished.apron

I finally finished a sewing project I started well before winter break – a new apron to wear when I am facilitating the creative mess in my classrooms.  I am pretty excited with the finished product – the denim came from the remnants section at the fabric store and the pockets from an old pair of Eric’s pants.

apron

The pattern is traced from a beloved apron that I have had more than ten years now.  I got it on clearance at the Whitney Museum in New York City and it has seen many a project in its day.  It is not worn out beyond wearing yet, but it has been repaired and reinforced dozens of times.  I love three things about this apron – the roomy pockets, the durable canvas (you can start to see the worn spots at the bottom of the pockets), and the fact that the ties are adjustable.  Simply pull on the two ties and the entire apron raises up to the perfect fit.  Now that I am teaching in two different schools, I wanted a second apron to prevent the clay dust and paint flakes filling my bag anymore than they already do, so I had to make a second apron.

I simply laid the existing apron on the denim and traced a pattern.  I left plenty of room for seams and sewed it up, making sure that i had several heavy-duty denim needles ready for my machine.  This is one area where it pays not to be stingy – fresh needles make all the different in the world of sewing.

seam.ripperFor the pockets, I dismantled a pair of much-loved canvas pants of Eric’s.  He wore them to ride to and from work frequently, and they have some wear and tear resulting from thousands of miles on a bicycle.  I got to taking apart the back pockets, which took quite a bit of seam ripping – a testament to the durability of the REI brand pants.  Oops, looks like Eric washed something in the pocket.

REI.pocket

For the tie, I simply used strips of the canvas pants sewn in half.  I left the edges raw, which means they will fray over time.  I figure if I hate them, no big deal, I will make a new tie with finished edges or use a length of store-bought cord.  I am lazy sometimes when it comes to sewing projects, and I will sometimes use contrasting thread simply because I do not want to make a new bobbin if I do not have one waiting and ready to go.  I opted for orange thread this time mostly because it was already set up with orange.  However, it is my favorite color and a nice contrast on the blue denim with the brown canvas.

My next project – using the leftover denim and canvas to make Eric an apron for when he is working on bikes.  Maybe it will help preserve his clothing from bike grease.

Tee Shirt Pillows

pillows

Two of my toddler’s favorite shirts were Christmas presents last year from grandparents.  The formerly two polka dot shirts, above, adorned my daughter in numerous photographs.  It was to both of our dismay when they very recently became 3/4 length sleeve shirts due to her rapidly growing limbs.  Seriously, it happened overnight.  Santa brought new shoes thinking they would fit in the spring – nope, she is wearing them already!  So, with the favorite shirts no longer in heavy rotation, I decided to immortalize them into pillows for her dolls or her bed.

shirts

Originally, I was planning on repurposing three of her critter shirts.  The top kitty shirt was spared because my sweet daughter said to me, “Thank you for the pillows, Mommy, but I was going to give the shirts to Dylan.”  Dylan is her youngest cousin.  I just about melted – I should have been smarter and asked her before cutting up these beloved shirts – of course she would want to share them! So, the My Kitty Loves Hugs shirt was pardoned from pillowization.  (Sidenote: Please excuse my youngest’s leg cameo).

pinned

This was an easy sewing project that even children could complete themselves as an introduction to sewing.  Knit fabric is forgiving and can take on interesting shapes.  I was not interested in making perfectly geometric shapes, instead going for a more tilted stylized look.  Next time I cut up old shirts they will be mine or I was ask permission first.  Lesson learned!


6 months and a New Year!

Oh Happy New Year to you!  I admit, I was in bed last night by 9:30 and it was GLORIOUS!  My littlest one, who is now 6 months(!!), was in bed by 6:30 and then up again at 9:30 and after the second time up, I took my cue to get to bed.  It was worth it – he made it for an almost 6 hour stretch of sleep.  I tell ya, I don’t know what I will do when I finally sleep through the night again.  After five and a half hours of sleep I feel I could conquer the world!

xmas.treeChristmas came and went and now I sit here facing a new year chock full of milestones for both kids, events with family and friends, and always new opportunities.  Of all the posed and practiced shots from the holidays, this is my favorite.  Older sis, desperately trying to prevent younger brother from grabbing ornaments off the tree, all the while telling him to, “Look at mommy!”  Meanwhile, my hubby is just off camera, laughing, and holding Q up.

Oh what a Christmas it was, indeed.  Seeing the wonders of Christmas through a child’s eyes is truly magical.  Now that there are two of them, it is twice as magical.  Read on for a much overdue update on our family, or just skim/skip and look at annoyingly cute photos of my clan.  Whatever suits your mood.

IMG_3717

One of the highlights of the past 6 months was watching Greta spoon feed her brother some of his first solids (listen to me, I know!  I sound ridiculous, or I guess like a nursing mother appreciating sweet relief!).  I stood by making sure she didn’t push the spoon in far enough to gag him!  Solids have made all the difference in his attitude during the day – not so frantic and very eager for mealtime.  I just hope it wears off on sister and some friendly competition kicks in and kills the toddler picky eating.

jumpingThis kid cracks me up – such a charmer and loves to jump and move.  He is itching to crawl.

IMG_4178This break he has been working hard on sitting on his own.  The dog, cats, and sister are all incentives for him.

IMG_3958

Meanwhile, toddler sister’s artistic side is blossoming.  I love watching her color, draw, and sticker away.  Her creative side really shines by her love of patterns in the dressing of herself.

banana.bread

I discovered a new quick bread over break – peanut butter and jelly banana bread.  It is from Better Homes & Gardens and definitely my new go-to banana bread recipe.

xmas.card_edited-1

So, as we embark into 2015, I reflect back on 2014 and its ups and downs.  I have made a few resolutions for myself, and they are for myself.  I spend 95% of my day doing things for others – whether at work teaching or at home with the kids, animals, and never-ending laundry.  A few things I resolve to do this year:

1. Read more (silently, not aloud to children).   I do plenty of reading to my own two kids, as well as my students.  I want to read more fiction, best-sellers, non-fiction…you name it!  I have been on a short kick reading eBooks, but want to get back into physical books.

2.  Make weekly time for creating.  Let’s face it, having kids takes up all your time. Oh do I miss my own hobbies.  However, I don’t want to miss the amazing things happening so quickly in their lives.  So, I figure, weekly is not overdoing it by any means at all.  Hopefully, as I begin to sleep more, I can carve more than weekly time for creating.  This one is an important resolution, as I have finally figured out that I need to create like some need to go on runs.

3. Spend more time appreciating my dog and two cats. 2/3 of my animal friends are elderly and facing some health issues.  Sometimes, I admit, I let it get to me.  I caught my toddler using her foot to roughly move a cat out of her way the other day and saying in a far too familiar way – “Move, move!”  Time to slow down, appreciate the furry members of our family, and model loving and endearing behavior for my children.

There you have it, my resolutions for 2015.  What goals have you set for yourself?

Holla, Challah!

I believe that most human beings have something they love to labor over – something that is time consuming and yet fills us with joy to produce.  How else could frescos, croissants, quilts, and War and Peace exist?   My labor of love is yeast bread.  To be fair, I don’t really think that yeast bread is a laborious task – though one must dedicate a chunk of time, from start to finish, in order to have the desired results of yeast bread.  There is no scrimping.

recipe
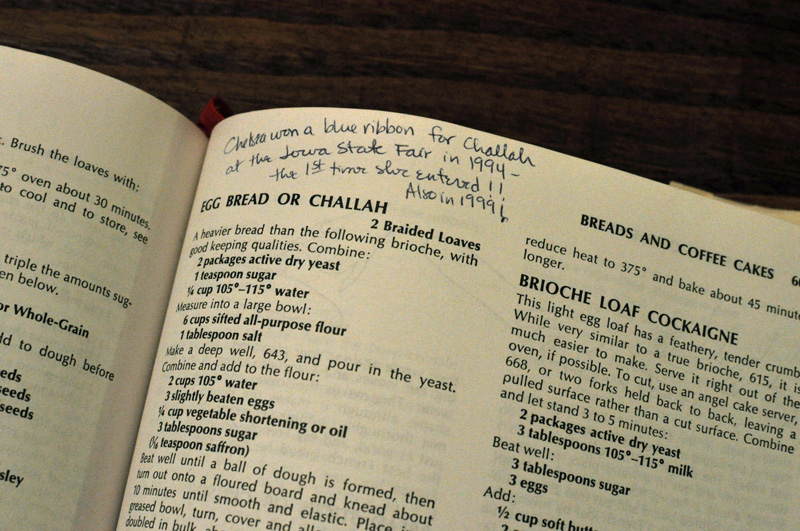
My love of yeast bread started with Challah.  I don’t remember what prompted me to start baking Challah the first time, or how old I was the first time I made it.  In my younger years, I entered it twice in the Iowa State Fair, winning a blue ribbon each time (preview of what’s to come, NO blue ribbon for this batch).  Typically, I make Challah around Christmas time, and serve it warm with a mixture of honey and butter as a topping.  I have also been known to make Challah for special occasions such as family gatherings and friends’ birthdays.  I always use the Joy of Cooking’s recipe from my 1975 edition, the one with the handwritten note about my successes from my mother.  I will walk you through the steps to making Challah and do my best to explain the tricks I have discovered over the years, however, I will warn you, my batch this year was a flop.  This is no picture-perfect outcome post, but an oh, well, better luck next time.

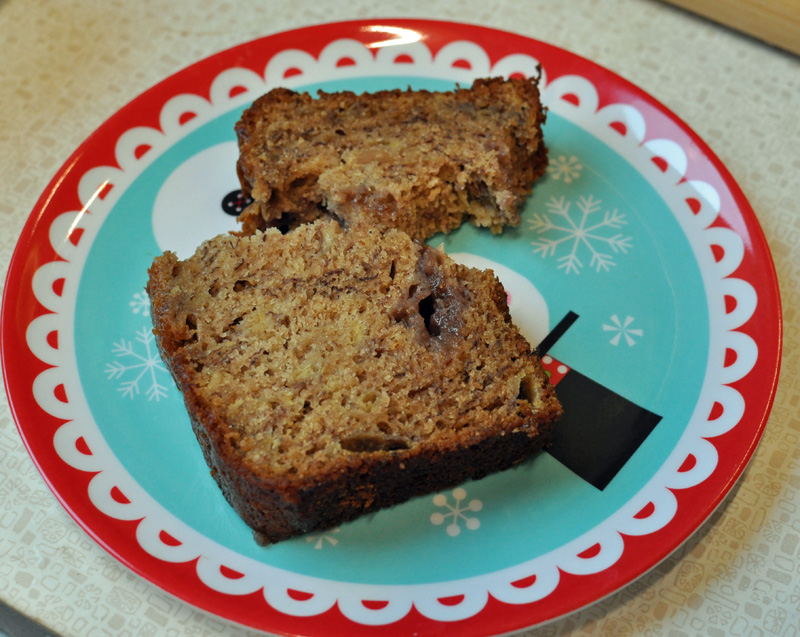
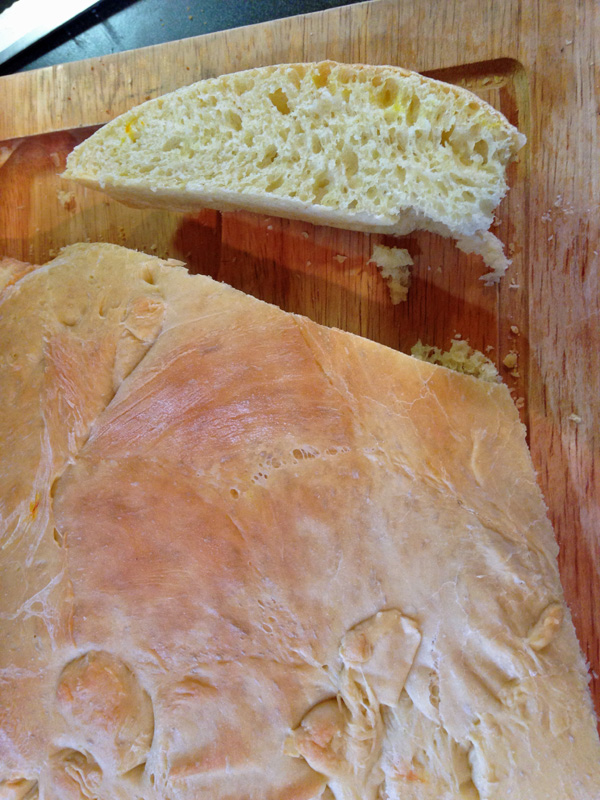
For the first time I can recall, my friends, my dough dropped.  The perils of baking yeast bread around young children and babies is the forgotten kitchen timer.  I either did not set mine, did not hear mine, or the kitchen goblins who leave piles of dirty dishes in sinks turned it off for me.  In any case, my dough rose and dropped before I could get it into the oven to bake.  However, since I was being watched by little eyes, rather than dumping the entire doughy mess into the trash, I pressed on and baked it anyway.  I am finally listening to my young daughter’s toddler voice belting out the chorus to her favorite wintery animated movie about sisters and snowmen and letting it go.  The outcome was a deliciously chewy, still tastes like Challah, but looks more like a focaccia loaf of bread.  So, my lesson out of all of this, enjoy the process and move on when it doesn’t work out.  I promise to post more of my flops, for the Internet is far to full of picture-perfect images of meals that look as if they only could ever be made in the top restaurants by the top chefs.

Enjoy whatever labor of love you create, and above all, do not fear the yeast bread!

temp
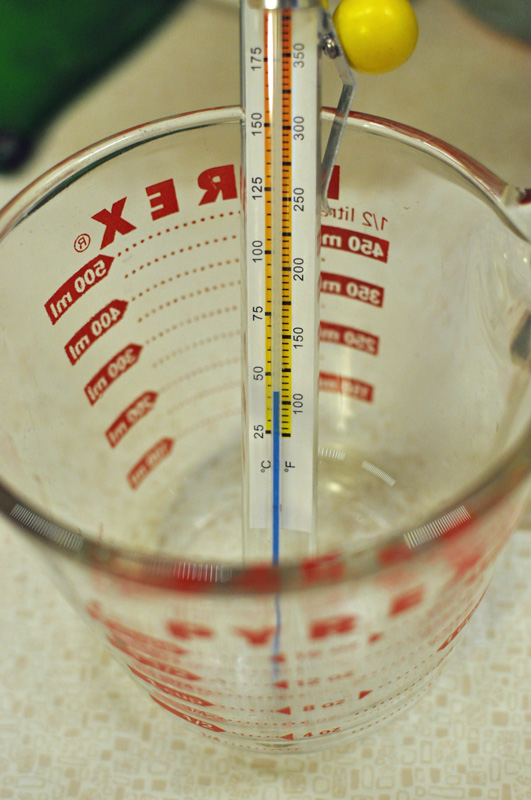
The most essential element to baking successful yeast bread is the yeast.  I know, duh, but bear with me.  The most basic recipe for raised yeast bread is flour, water, yeast, and sugar.  Fairly simple as long as your understand your ingredients and their limitations.  Keeping the temperature just right is important – too hot and you kill the yeast, too cold and it does not rise.  This goes for the first mixing of the yeast all the way to the last rise.  I use a candy thermometer to keep my water just right.  I highly suggest The Bread Bible cookbook as a valuable resource on all things yeast bread.

yeast.rising
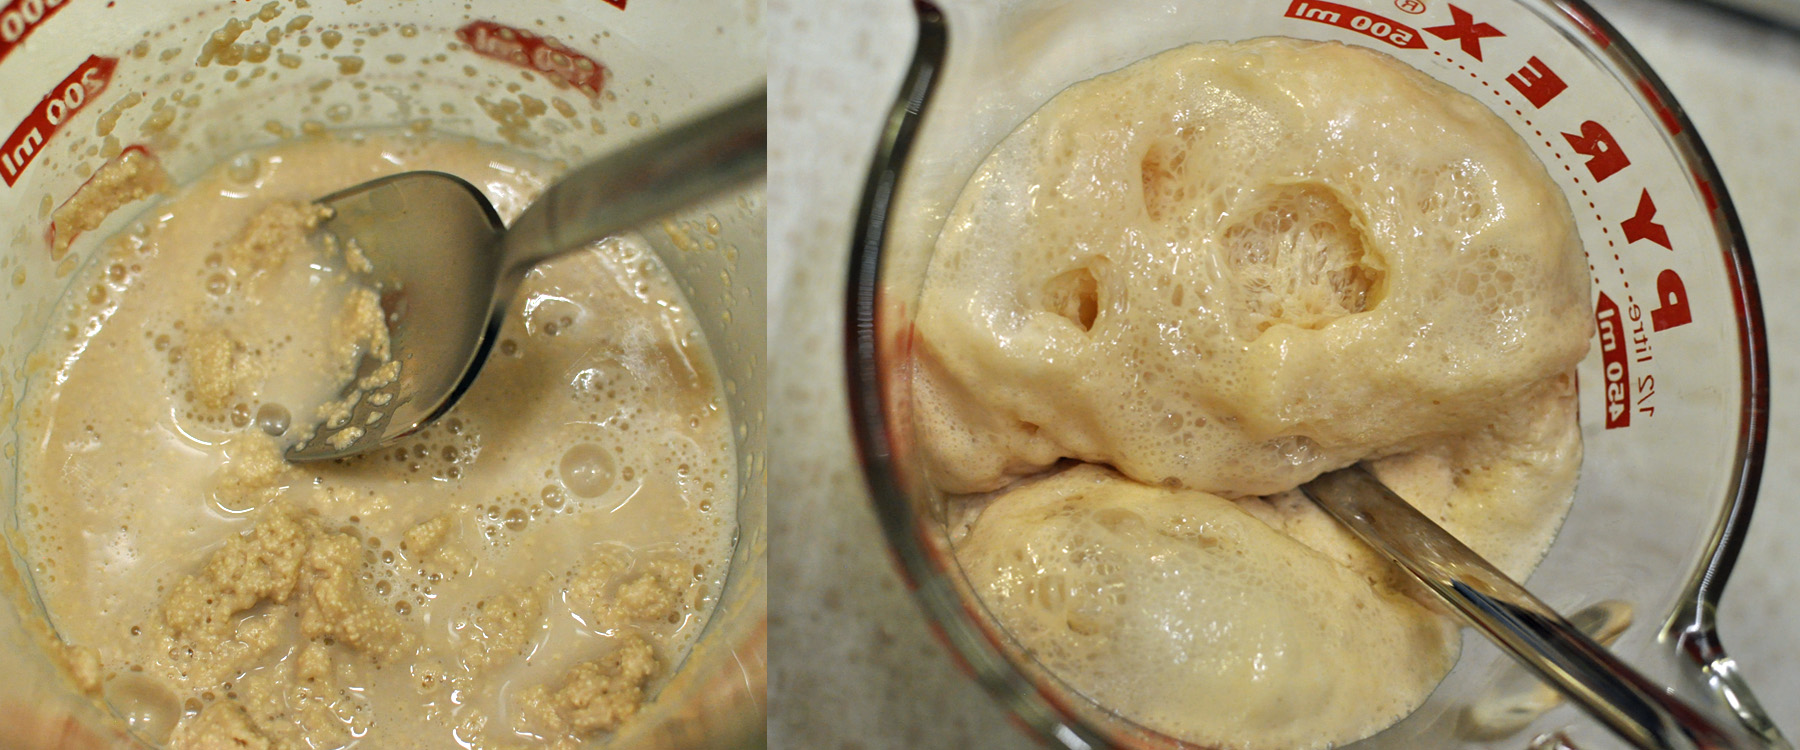
Proper yeast, water, and sugar mixtures should go from grainy, left, to foamy, right.  Old yeast will cause problems.  This is why I store jars of yeast in the fridge, or better yet, if you are an infrequent yeast baker, use packets.

kneading
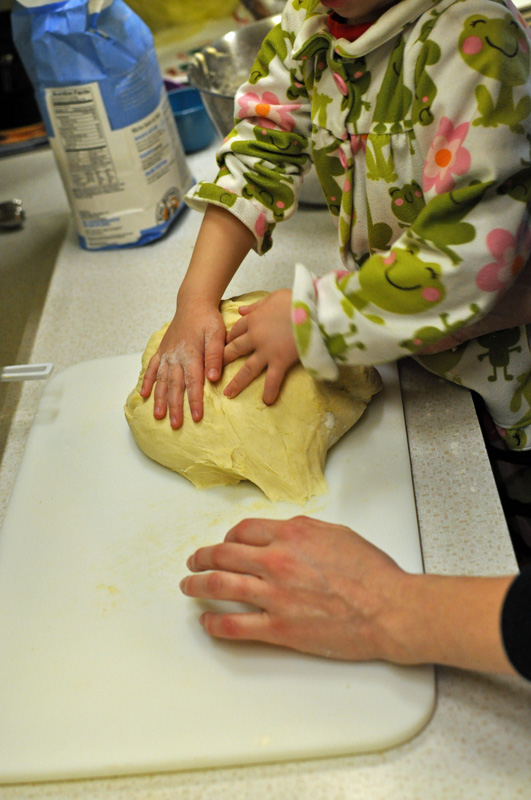
Kneading is also oh so important.  This is the step that ensures all ingredients are properly mixed together and also helps to remove large air bubbles.  If you have ever tried to butter or jelly a slice of bread with a large hole in it, you have seen first hand what poor kneading looks like.  I had my little helper working on her kneading skills for this batch of Challah.  She can’t quite get the movements just yet, but she sure was eager to try!

dough2
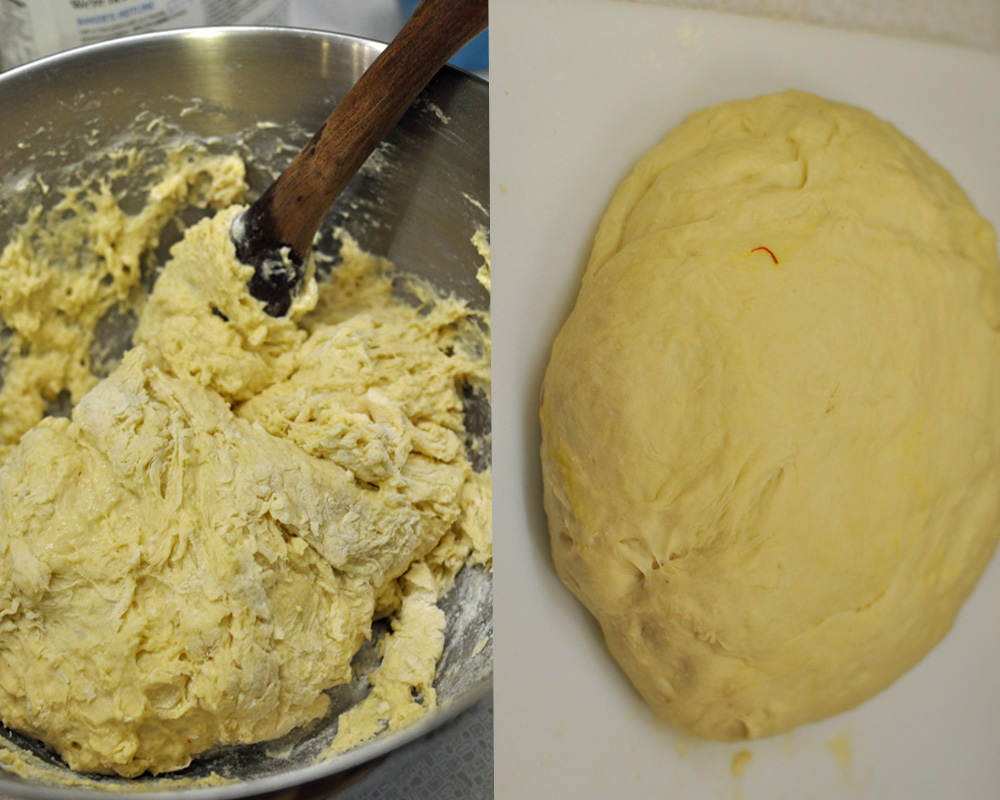
Your bread dough will start off rough and sticky, left, and with the help of extra flour and kneading motions, go to smooth and elastic, right.  Note, it always takes me longer than the recommended 10 minutes in the recipe!

saffron
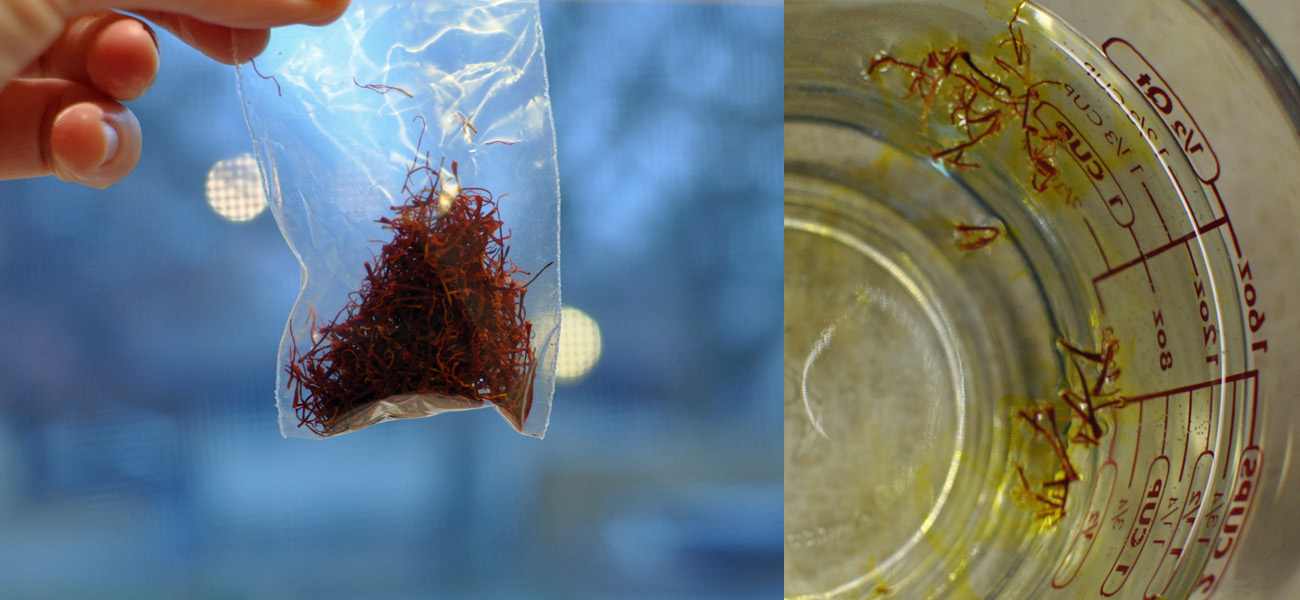
The coloring of this bread comes from the use of eggs in the recipe, hence its other name, egg bread.  However, the flavor comes from an exquisite spice known as Saffron.  I never use the powdered form, only the stigma from the crocus plant that makes this the most valuable spice in the world.  I use a pinch and soak it in the warm water before adding it into the rest of the liquid mixture, just before mixing up the dough.

ready to riseOnce the dough is mixed and kneaded, return it to a greased bowl.  I use a large mixing bowl that  holds over 6 quarts.  Cover the bread with a dish towel and let rise until doubled, about 1 hour.  Watch it closely so that they yeast does not over rise and then drop.  This image shows the dough doubled in size and ready to be punched down and braided into two loaves.

braid
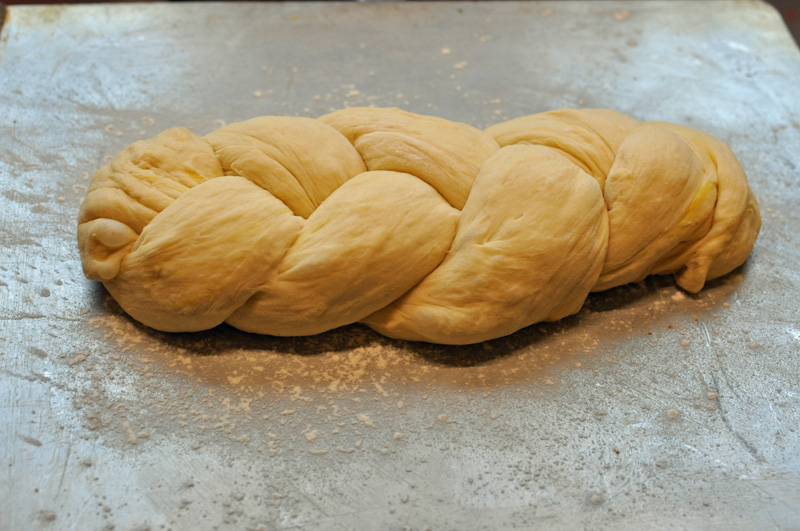
Braid into two loaves and place on greased and floured baking sheets.  Cover and allow to rise once more until doubled.

flat
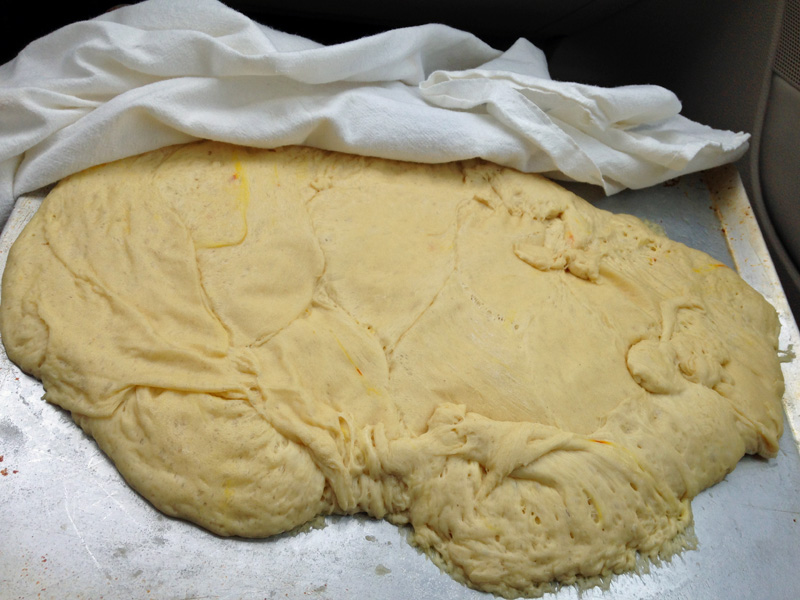
Do not, I repeat, do not allow bread to rise more than doubled!  This is my hot mess that should have been a gorgeously larger version of my first braid.  Sigh.

IMG_4082
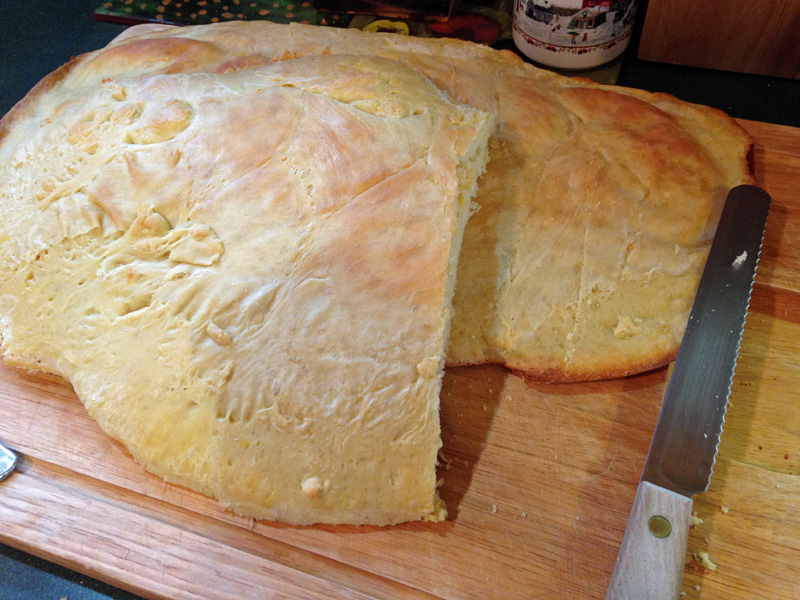
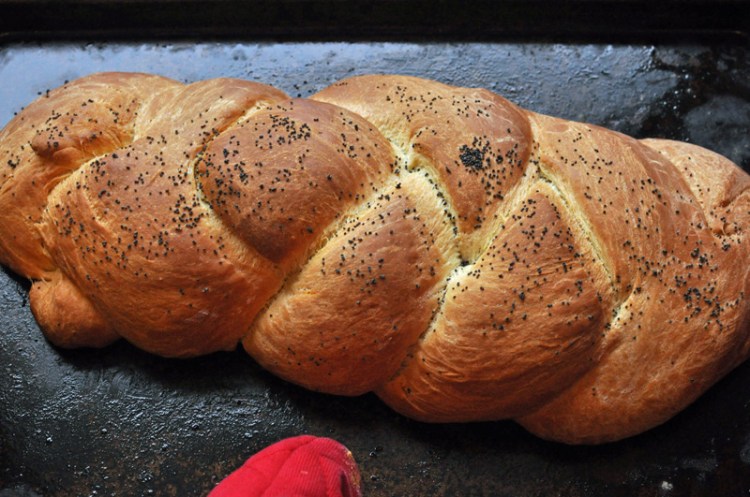
Brushing the tops of the loaves with an egg wash before baking, creates a lovely glossy brown finish.  I was a little too disgusted with my fallen bread to do such and so mine have a more powdery golden finish.

IMG_4083 Welcome to flatbread Challah and here’s to turning a new leaf just in time for 2015.  Happy New Year and happy letting go!

Challah or Egg Bread, from the Joy of Cooking, 1975 edition

Combine:

2 packages active dry yeast

1 teaspoon sugar

1/4 cup 105° – 115° water

Measure into a large bowl:

6 cups all-purpose flour

1 tablespoon salt

Make a deep well and pour in the yeast.  Combine and add to the flour:

2 cups 105° water

3 slightly beaten eggs

1/4 cup oil

3 tablespoons sugar

1/16 teaspoon saffron 

Beat well until a ball of dough is formed, then turn out onto a floured board and knead about 10 minutes until smooth and elastic.  Place in a greased bowl, turn, cover and allow to rise until doubled in bulk, about 1 hour.  Punch down and divide dough into two sections, kneading each for several minutes.

Now, to make the braids.  Cut each section of dough into 3 parts and roll between the hands or on a board into long tapered cylinders.  With the three ropes of dough lying side by side on a greased floured sheet, start to braid loosely from center to the end, then braid the other portion from center to end.  Finish the ends by tucking them under.  Repeat for the second loaf.  Cover and let rise until almost doubled in bulk.  Brush tops with French Egg Wash (1 egg yolk diluted with 1 to 2 tablespoons of water).

Bake 15 minutes in a preheated 400° oven, then reduce heat to 375° and bake about 45 minutes longer or until golden brown on top and hollow sound when bread is tapped.


Updated image from Challah made in December 2015:
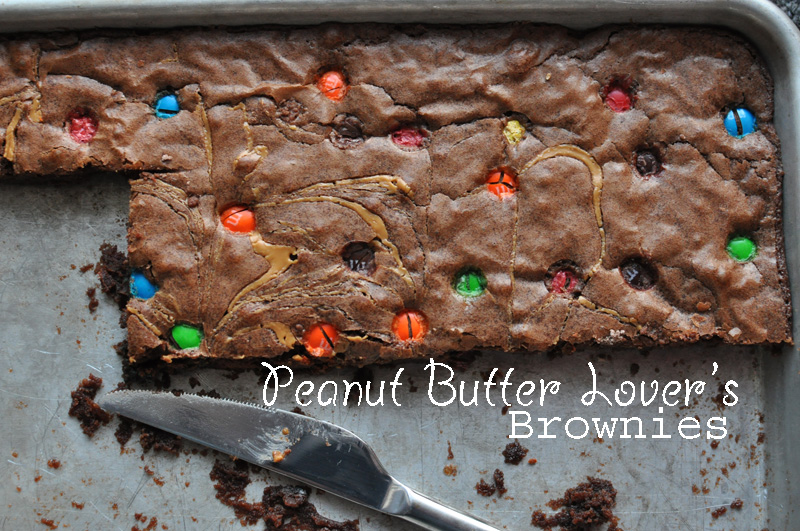
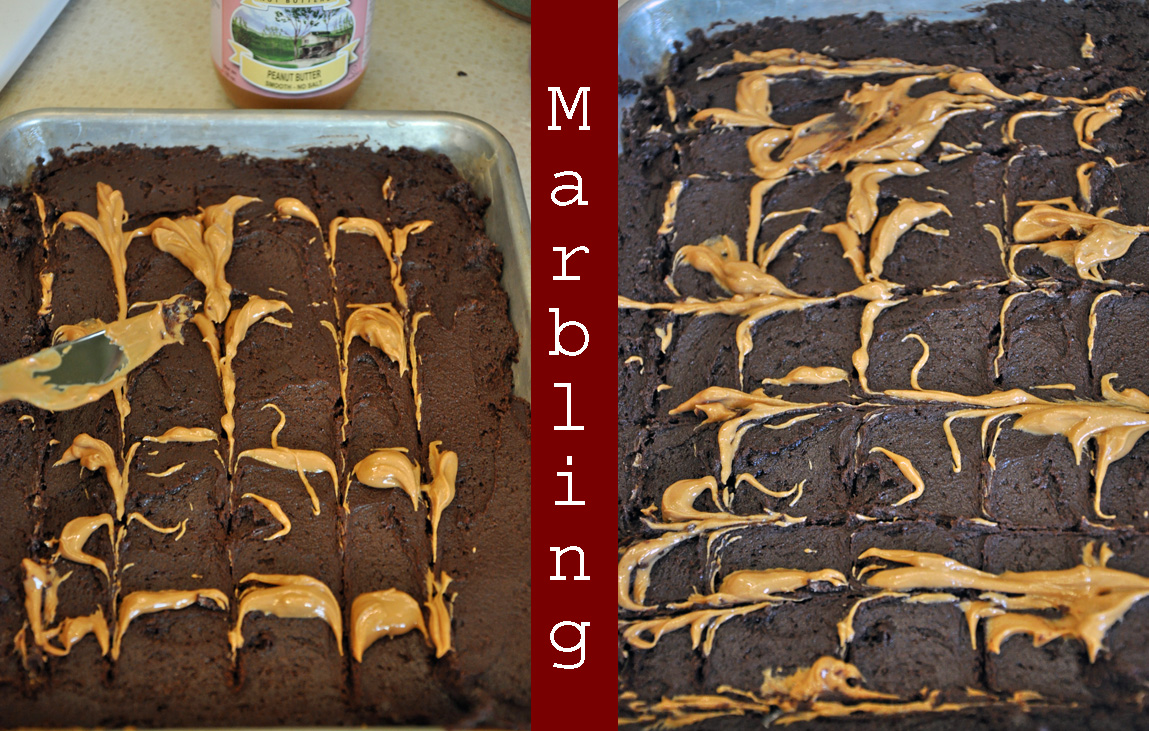
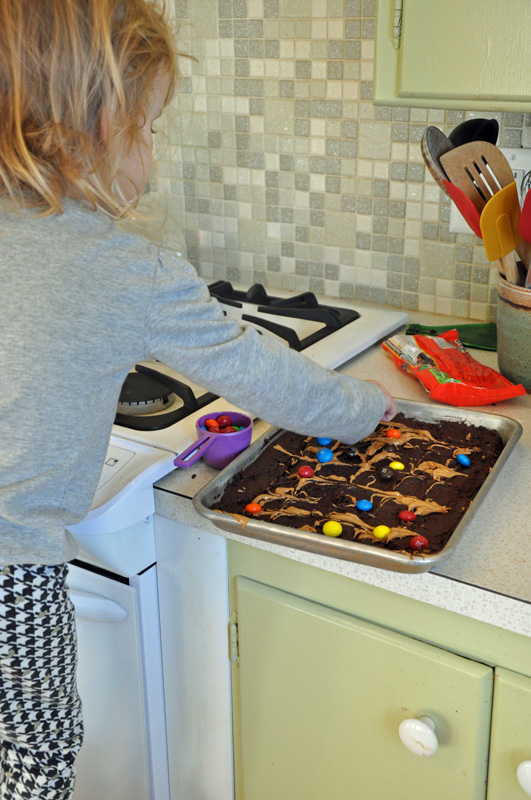
challah

DIY Color Shape Magnets

magnet.shapes

We recently made a trip to Eastern Iowa, as a family, and brought along these fun colorful magnets for car entertainment.  When not in transit, they reside on the refrigerator where they provide hours of fun during meal prep time.  The image above is a house, according to Greta.  She it recently created it from the various geometric shapes and door shapes we cut out for her to use.  Read on for the simple steps to make these.

IMG_3335

The inspiration came from the Des Moines Art Center and their kids’ activity area.  They provide lunch boxes filled with colorful vinyl magnets for quiet, creative entertainment for kids while in the galleries.  Greta was so enthralled with them, we knew we had to create our own.

cut.magnets

We ordered the vinyl magnets from Amazon.  They come in a 5 pack of 8.5 x 11″ sheets and then we cut them into various shapes using my paper cutter, scissors, and a hobby knife.

cookie.cutter

Eric got creative and pulled out a few cookie cutters to use as stencils.  He traced around them and then used a hobby knife to cut them out.  Her favorites are the dinosaur and ninja shapes.

fridge.magnets

Rather than the lunch box as a magnetic surface, we opted to use a cookie sheet for travel, that way she has room to create larger scenes and keep it on her lap.  The cookie sheet can also double as a lap desk for books and drawing.

IMG_3451

Next up: creating sets of these for my classroom to use as free time activities.

Natural Dyed Frosting

car.cakeI wrote this post a while back and them promptly forgot about publishing it, as my life got twice as busy the day after this party.  Greta saw her dream cake in a Meredith Publishing special interest magazine and insisted on having car cakes for her birthday this past June.  I am not a master cake decorator, as you can see, however, it was fun and the toddler birthday girl was delighted at the final products.   I was excited that I finally got to try using natural dyes for the frosting.  I must admit, I was hesitant, for fear of weird flavors or slightly off colors.  I am happy to report that the cakes were deliciously rosy pink and sunny yellow.


cake.halvesI started with two 9-inch chocolate cakes (from mix).  Once they were cooled and removed from the pan, I sliced them in half and stood them up like so.

car.shapeNext, I cut a notch out of the cakes to make the windshield indentation.  I went wild and whipped up some homemade butter cream frosting.  Homemade butter cream frosting is my go-to cake topping – it’s perfectly sweet, thick, and distinctly different from the store-bought tubs of frosting.

natural.dyeI tried to cut as many corners as possible since I was VERY pregnant and knew I would be standing in the kitchen for some time that day.   I got smart and only allowed myself partial from scratch birthday cakes – the frosting because, as I said before, I really wanted to try the natural dye and avoid the crazy Red Lake 40’s and such.  For the yellow, I used ground turmeric.  I sprinkled liberally, mixed, tasted, and repeated until I had the nice sunny yellow that I knew my birthday girl would love.  Then, with the leftover yellow frosting, I added beet juice, from canned beets.  I mixed until I had a nice rosy pink color.  The frosting had a slightly different aroma to it, but again, no different taste due to the dyes.

treats

Normally I am not fond of decorating cakes – I am just not patient enough with frosting, piping, bags, and tips.  I wouldn’t even dream of using fondant!  This time, though was different, I didn’t worry about rushing or making it just perfect.  It was fun hunting for the perfect items to make the elements of the car.  Oreos with large chocolate disks held on by frosting dots were wheels.  The windshield was cut up fruit leather.  The headlights and decor were made from YumEarth Naturals, Sour Jelly Beans (seriously better than I ever imagined they could be!).  The racing stripe by one (extremely artificial dyed and flavored) Air Head sour strip.

usBirthday girl and family all raced to dive into the car cakes.  Greta was so excited and showed them off to the entire family.  I was just thrilled to see her so delighted.  Here we are still as a family of three – it was a good thing we decided to take a family portrait, as little brother arrived the very next day.