Happy Early Valentine’s Day

Since this year’s Valentine’s Day cards are already in the mail, I decided to upload this early.  This year I decided to do several variations on the print. One set was my multi-cultural set with different shades of browns for the paper.  I used a variation of hues for the ink – red, magenta, and silver.  The silver ink was very interesting to work with – for one, it smells quite a bit like a permanent marker, and two it takes a great deal more drying time than the other non-metallic inks.  The end effect of the silver ink on the maroon and dark brown paper showed wonderful contrast. 

 Valentine’s Day cards, block print on colored paper, 2010. 
Multi-cultural set showing red & pink ink.
 
Valenetine’s Day cards, block print on colored paper, 2010.  
The set of maroon, red, and brown paper with silver ink. 

Diana Photographs

I love my newest toy – the Diana camera, a medium format camera.  This little gem takes the most dreamy photographs and the effects are timeless.  I had it in Iowa over Christmas and then took it to Minneapolis for a couple days.  There was a steep learning curve though, expose longer than you think necessary, or use a stronger flash than what comes with the Diana.  I actually ended up using the flash for my 35 mm camera and that seemed to work very well.  The Diana flash is fun and can change colors, but it is not very strong.  I got the gear from lomography, a dangerous site that one can easily be sucked into perusing for hours on end. 

 Here are a few of my favorite photos from the 6 or so rolls I had processed this past week.  The best part about this cheap turquoise plastic camera: it has made me forget about my longing for a DSLR camera, well at least for the time being.

Barn.
 
Mom and Dad Walking.
 
Bombay.

Eric and Chelsea, double exposure.
 
Des Moines Art Center. 

Eric and Brownie at Hanging Rock State Park. 

something old something new

My latest Martha had a wonderful idea that I decided to try out this past weekend and with 4 days off from work I had plenty of time to catch up on reading and my crafts.  I ran to the local craft store and picked up some felting needles, roving wool, and a piece of foam to work on.  Martha sometimes makes things look easier than they are, but this felting project was so easy, I am thinking about how I could use it with my students! 

I took an old Ann Taylor sweater I had picked up at Goodwill a while back, and just started adding blue and white polka dots randomly over the sweater.  I started by filling in the few small holes and then filled in with dots where it seemed necessary for aesthetic purposes.  I had originally bought this sweater to use in a set of indoor bocce ball sets I was working on as Christmas gifts last year.  This was also an easy and fun project to do. 

My finished felted sweater.

If you are interested in felting it is really very easy and basic.  To use old sweaters, I simply wash them in the washing machine with hot water and soap.  I set the rinse cycle to cold so that the shock of the temperature change will shrink the fibers more quickly.  Be sure to wash like colors with like, as you will lose some of the dye.  Then, I dry the sweaters on hot until they are dry to the touch.  Now the sweaters are ready to be cut up.  I have turned them into table center pieces, pouches for glasses, pillow cases, and beautiful sculptural spheres.  The nice part about felting old sweaters is that you are reusing, don’t have to knit, and don’t even have to sew the edges to prevent fraying. 

The bocce set was a little more complicated.  I knotted strips of felted sweater together until it was about the size that I wanted the final product to be.  Then, I took lengths of loose wool (roving) and tied it around the knotted balls.  I then took old athletic socks (the short ones) and put the wool balls inside the socks, twist tied them shut, and washed them as I mentioned above.  I dried the balls, socks and all until they were dry.  The roving shrinks and the sock keeps it all perfectly spherical.  If you use two different colors of wool – the sweater one color and the roving another – you can achieve really beautiful marbled effects from the different wools. 

gallery picture

I completely forgot to post this picture of me in front of my collage at the showing I had this fall at UNCG.  The gallery space was lovely and it was wonderful to see my colleague’s work.  What was most interesting to me, was to see what media each of us work with.  I am so used to seeing these individuals at our meetings talking about kids, grades, student work, and curriculum that I forget each is also an artist. 

happy fat squirrel

Squirrel, oil pastel on paper, 9 x 12″, 2009.

This drawing was Mary Elise’s birthday card/present this year. She mentioned a while back wanting an original CBH artwork, and since we both share a love for squirrels, I thought I would make her a squirrel.  Mary Elise, I think first fell in love with the squirrel when she went to Minneapolis for a conference.  She was blown away by how big the squirrels were in comparison to NC squirrels.  The Minneapolis squirrels have to pack on a few more pounds before the winter to survive.  I have always loved squirrels.  My dad’s nickname for me is squirrel, but I have always loved their erratic behavior and knack for finding food.  Any animal that squirrels away food for later use, is a fan of mine.  

This was a fun drawing to make because of the subject matter and the interesting texture throughout the piece.  Lucky Mer has a fat squirrel for her collection now.  

National Boards

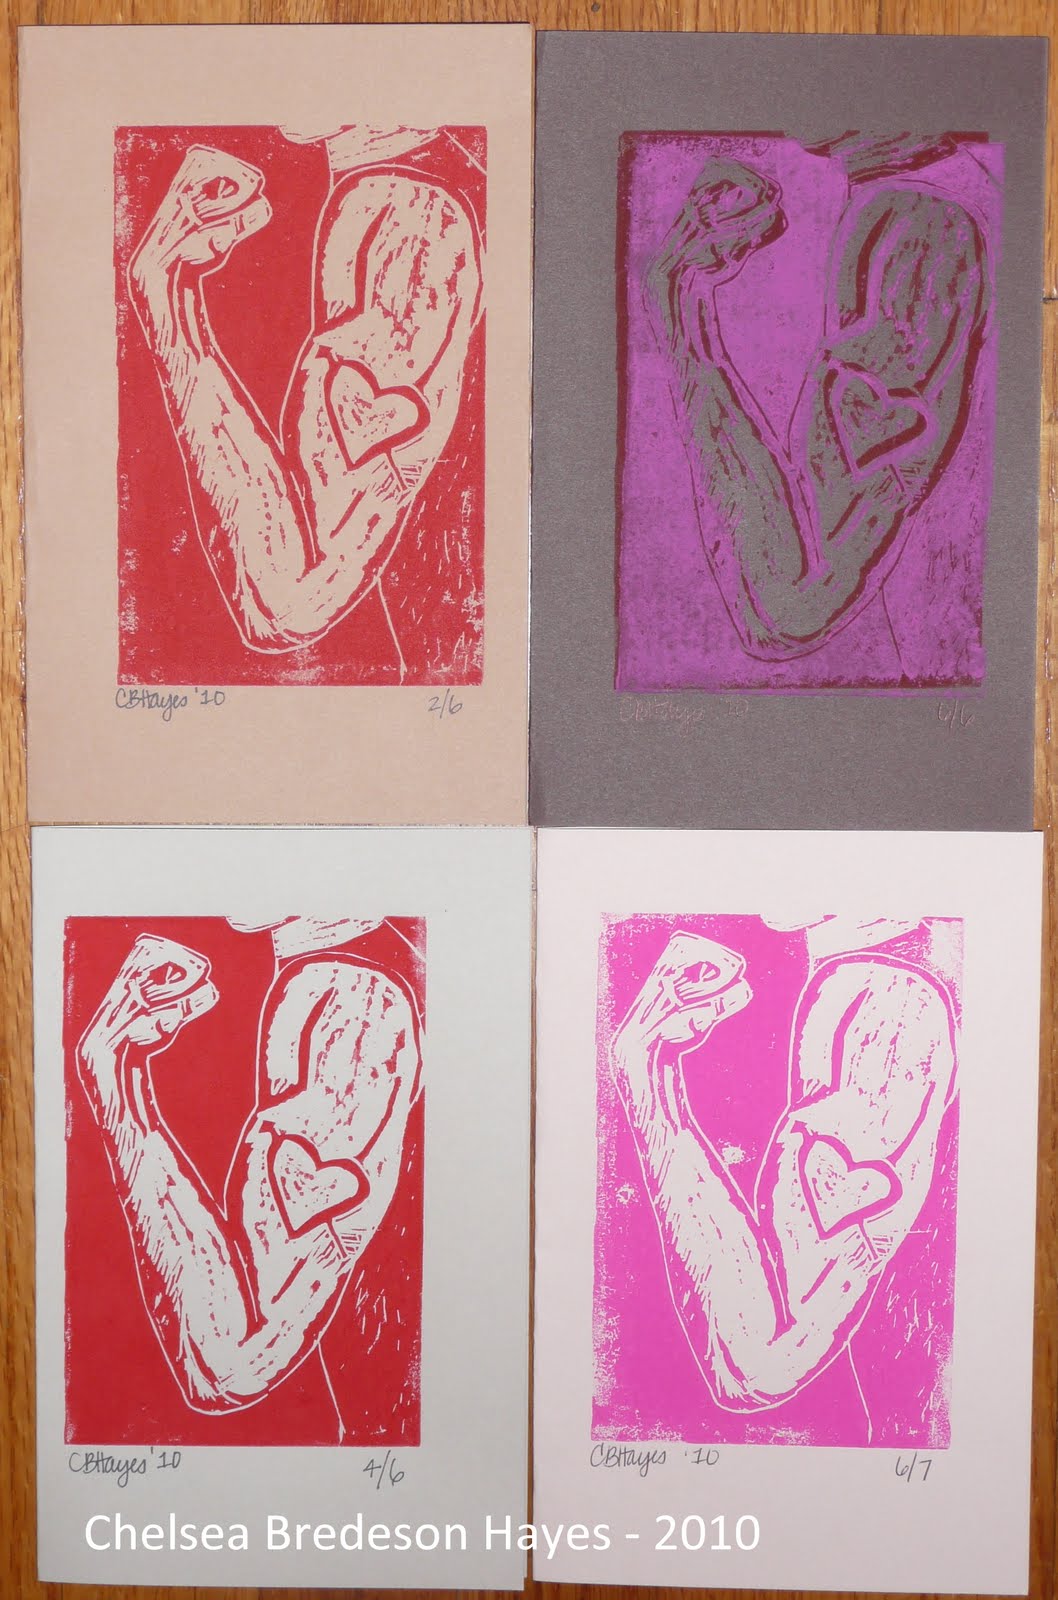
I found out yesterday morning that I passed my National Boards!  I had been waiting to post anything about this process until I knew for sure whether or not I passed.  1 out of 3 teachers passes this process the first time.  The other 2 out of 3 have to retake.  The process consists of creating a portfolio of your teaching style, curriculum, and interactions as a leader.  Once the portfolio is submitted, you must take a very broad test on the role of art in society, art periods, value of artwork, styles, etc. etc. 
One portion of the test is to create an original artwork.  The rules about the artwork are very specific and come packaged with all the materials one needs (minus scissors and glue stick).  When I saw that the requirements were to create a collage, I was ecstatic.  So I made my collage, thought about it, and wrote about it.  On the day of my test, last May, I took my collage with me to my testing center and had to give it away with my answers to their prompts.  Below is a photo of that collage and the written work I prepared before taking the test last May. 
 
Collage for National Boards test, cut & pasted construction paper, 8 1/2 x 11″, 2009. 
The artwork I created is an abstracted aerial view of a river.  I wanted to work with a theme from my region of the country and decided to on rivers as an appropriate subject-matter. 
I began by drawing several sketches in my sketchbook to get a feeling for the colors and shapes I was going to be working with.  I tried a couple different angles and decided on a strong diagonal plane for the curvy river shape.  I cut the river shape as one continuous piece of paper, drawing with my scissors, as Matisse called his collages.  I wanted the river to be the largest shape in the composition.  To make the river stand out from the background fields, I chose a lighter color.  I decided to make the river an organic and almost calligraphy-like shape to contrast with the linear and geometric shapes in the background. 
Next, I added the rectangles throughout the background area.  I wanted these rectangles to be balanced with one another but not perfectly spaced – to emulate fields or buildings planned by people but not always lined up perfectly.  To make a stronger composition and to unite the loose and floating rectangles, I added lines using the medium brown color.  I wanted the color to be a different color than the river shape.  These lines not only help to balance and bring order to the composition, but also create contrast against the organic river shape.  I purposely left a few of the rectangles “floating,” with no connections to lines for some empty or resting spots for the eyes. 
I added the two ovals on the left hand side to bring some of the organic shape into the background.  However, I am not happy with those two shapes.  I find them to be distracting and a poor choice for this particular composition.  The glue stick is quite permanent and when I tried to tear the ovals off the page, it took too much of the background color with them.  I decided they would just have to stay put.  Had I had any more of the dark brown paper, I would have just glued two pieces of dark brown paper over the lighter ovals.  In hindsight, I wish I had placed the ovals without any glue first to evaluate their appropriateness. 
One effect I do like is the raised edge along the outer edge of the river shape.  When the river was glued down, the shape shifted causing some wrinkling and warping of the paper.  I decided to leave this effect as it was, because the shadow created by the raised edge further emphasized the organic shape of the river.  Collage is an interesting medium to work with because of this texture and creation of shadows. 
Collage has its challenges – glue sticks can be a plus or a minus depending on the size of paper being used.  One challenge I encountered was in lining up the small lines with sticky fingers from the glue stick.  Collage’s greatest asset is its ability to morph and change.  Collage has endless possibilities in terms of techniques and papers. 
I opted for smooth, cut edges because I wanted a simplified and abstracted landscape.  Some of my inspirations were from the west coast landscapes by Richard Diebenkorn, who worked with large expanses of color and geometry. 

Cat in Window


Tsali in the Window, collage & mixed media on paper, 18 x 24″, 2009.

This is my newest complete piece of artwork. I just dropped it off this afternoon for the K-12 Art Educators: Passion & Knowledge show. The show will be at the Gatewood Gallery at the University of North Carolina Greensboro from October 19 – November 6. The opening reception is on Saturday, October 24th from 2 to 4 pm.

Check out the gallery link for more information.

Posted by Picasa